

Sous vide pork shoulder is the stress-free way to make the best-pulled pork. The easy, hands-off technique of sous vide cooking for 24 hours followed by smoking for a few hours with your preferred hardwood will yield a texture of smoked pulled pork that can't be achieved with other traditional cooking methods.
Sous vide cooking is amazing for when you are cooking pork. We have sous vide pork and sauerkraut on New Years Day for good luck, juicy sous vide boneless pork chops are a weeknight favorite all served with a side of sous vide potatoes.
I make this style pulled pork when I am going to have a bunch of people over for a family gathering or I will make it over the weekend to eat off of all week.
What type of pork should be used?
I like to use a bone-in pork butt, also known as a Boston butt, when I am making pulled pork. The butt cut of the pig is actually located in the upper part of the shoulder in front of the front leg. The Boston butt will contain a joint bone and often the shoulder blade. These bones will give additional flavor to the meat but will add to the total weight of the purchase.
Alternatively, a boneless pork butt can be used. There are no bones to work around and the price may be higher for this convenience. Everyone has their preference.
Recipe Card?
To find the full printable recipe with specific measurements and directions CLICK HERE to go to the recipe card.
Ingredient Substitutions
The ingredients here are flexible, as the sous vide method does most of the work, so small changes do not derail the result.
Here is what I suggest for swaps:
- Bone-in pork butt → boneless pork butt: Both work. Bone-in delivers slightly more flavor in the bag juices. Boneless is easier to fit in a smaller water bath and bags more cleanly. Cook time stays the same.
- Dry rub → your favorite BBQ rub: Any spice rub works here. The key is applying it generously on all surfaces so there is enough seasoning to penetrate during the long cook and to form a crust during the finish.
- Smoker finish → oven finish: 300°F for 1.5-2 hours in the oven produces a solid crust, though you'll miss the smoke. Add a teaspoon of smoked paprika to your dry rub to compensate.
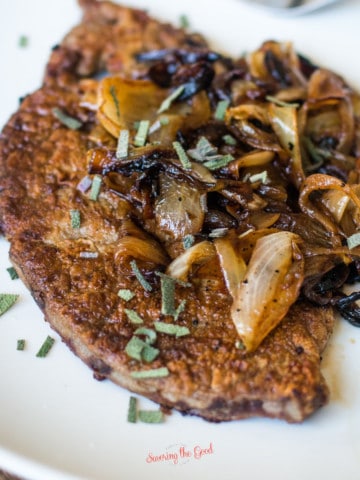
- 165°F (pull-apart) → 145°F (sliceable): If you want the pork to slice rather than shred, for serving over rice or polenta, drop the temperature to 145°F.
Texture Note
Note: at 145°F the pork will not pull into strands, so this is a texture decision, not a substitution.
Dry rub recipes
I would suggest using your favorite dry rub when making your pulled pork or even a rub from your favorite BBQ restaurant. But what if you don't have a recipe? I have you covered. Check out these dry rub recipes and use them as a starting point for amazing smoky pulled pork.
Spicy Dry Rub:
- 1 tablespoon chili powder
- 1 tablespoon cumin
- 1 tablespoon ancho chipotle powder
- 1 tablespoon garlic powder
- 1 tablespoon kosher salt
- 1 tablespoon black pepper
- 1 teaspoon onion powder
- 1 teaspoon Mexican oregano
- 1 teaspoon crushed red pepper
- 1 teaspoon cayenne pepper
Sweet Texas Dry Rub:
- ¼ cup light brown sugar
- 1 tbsp smoked paprika
- 1 tsp ground cayenne pepper
- 1 tsp chili powder
- 1 tbsp salt
- 1 tsp garlic powder
- 1 tsp onion powder
- ½ tsp ground black pepper
Sugar-Free Dry Rub
- 4 tablespoon kosher salt
- 4 tablespoon paprika
- 2 tablespoon black pepper
- 2 tablespoon garlic powder
- 2 teaspoon onion powder, toasted preferred
- 1 teaspoon ground celery seed
- 1 teaspoon dried oregano
- 1 teaspoon chipotle powder
Carolina style BBQ rub
- ¼ cup paprika
- 2 tablespoons salt
- 2 tablespoons white sugar
- 2 tablespoons brown sugar
- 2 tablespoons ground cumin
- 2 tablespoons chili powder
- 2 tablespoons freshly ground black pepper
- 1 tablespoon cayenne pepper
What are the advantages of sous vide a pork shoulder?
When cooking a tough piece of meat, such as a pork shoulder with lots of connective tissue, a low temperature, over an extended period of time will yield meat that falls apart yet maintains all of the juiciness and flavors that we love in pork shoulder. Sous vide cooking gives you precision temperature control cooking without having to monitor the cook.
- Meal prep - cook the pork shoulder days ahead and then finish on the grill, smoker or in the oven when you are ready to serve.
- Stress-free cooking - once the shoulder is in the sous vide, there is no need to attend to it. The circulator will maintain a precise temperature without help from you. Basically it is a 'set it and forget it'.
- Self-basting - The pork will self baste in its own juices with full contact on all surfaces. Any spice rub you put on the pork will further infuse the meat.
- Choose your texture - unlike other cooking methods, sous vide cooking will allow you to choose your preferred texture, based on the water temperature.
- Less smoker/grill time - After the first 2-3 hours on a smoker, the meat is no longer being infused with a smoky flavor. Using a 2-step cooking method, you are still getting the amazing smoky flavor and crust, without leaving it on the grill/smoker for hours on end.
What temperature do you sous vide pork shoulder?
The beauty of using sous vide to cook your pork shoulder is you have control over the texture and doneness of the meat. I suggest two different temperatures, depending on your desired doneness. My personal preference is 165°F / 74ºC for pull-apart, shreddable tender pork or use 145°F / 63ºC for pork that is tender but still sliceable.
Step-by-Step Instructions
Sous vide pork shoulder has two phases: the long, hands-off cook and the fast, high-heat finish that builds the crust. The sous vide handles all the actual cooking and the smoker or oven at the end is what makes it look and taste like you spent all day tending a fire. Because you kind of did.
Phase 1: Prep and Season

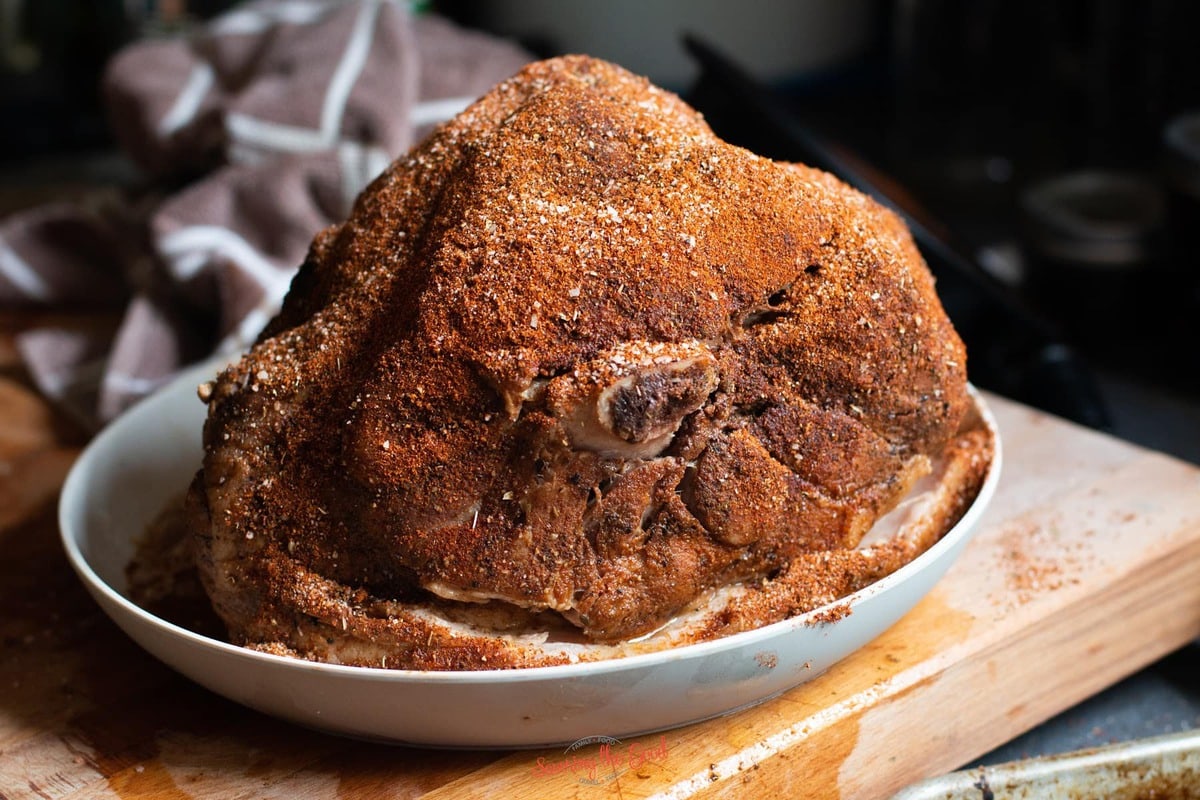
Dry brine the pork
Pat the pork shoulder dry on all surfaces with paper towels. Apply your dry rub generously, pressing it into every surface, including the sides and any crevices.
Flavor Tip
Do this 1-2 hours before bagging, or up to 24 hours ahead in the refrigerator uncovered. The salt in the rub draws out surface moisture and then pulls it back in, seasoning the meat all the way through.

Bag the pork
- Place the seasoned pork in a heavy-duty gallon zip-top freezer bag.
- Close all but about one inch of the seal.
- Slowly lower the bag into your water bath, letting the water pressure push all the air out through the opening.
- Seal completely just before the opening reaches the waterline.
Why not vacuum seal?
For bone-in pork shoulder, the water displacement method is strongly recommended over a vacuum sealer as the bone can puncture the bag during sealing.
Phase 2: The Sous Vide Cook
Set your water bath
Fill your sous vide container and set the immersion circulator to 165°F (74°C) for pull-apart, shreddable pulled pork. If you prefer pork that slices rather than shreds, set to 145°F (63°C). Allow the water to reach the target temperature fully before submerging the pork.
Time Saving Tip
Use the hottest tap water your sink will provide to fill your water bath. This will cut down on the time the circulator will take to reach the set temp.
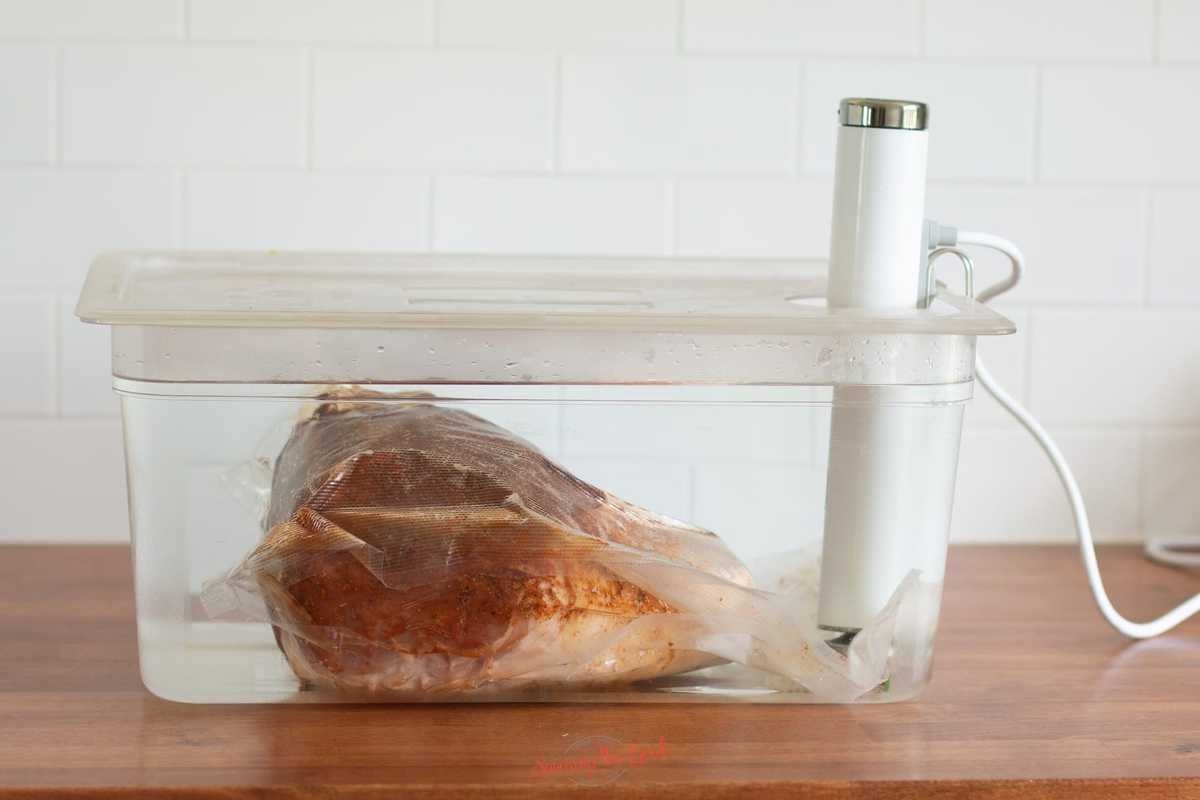
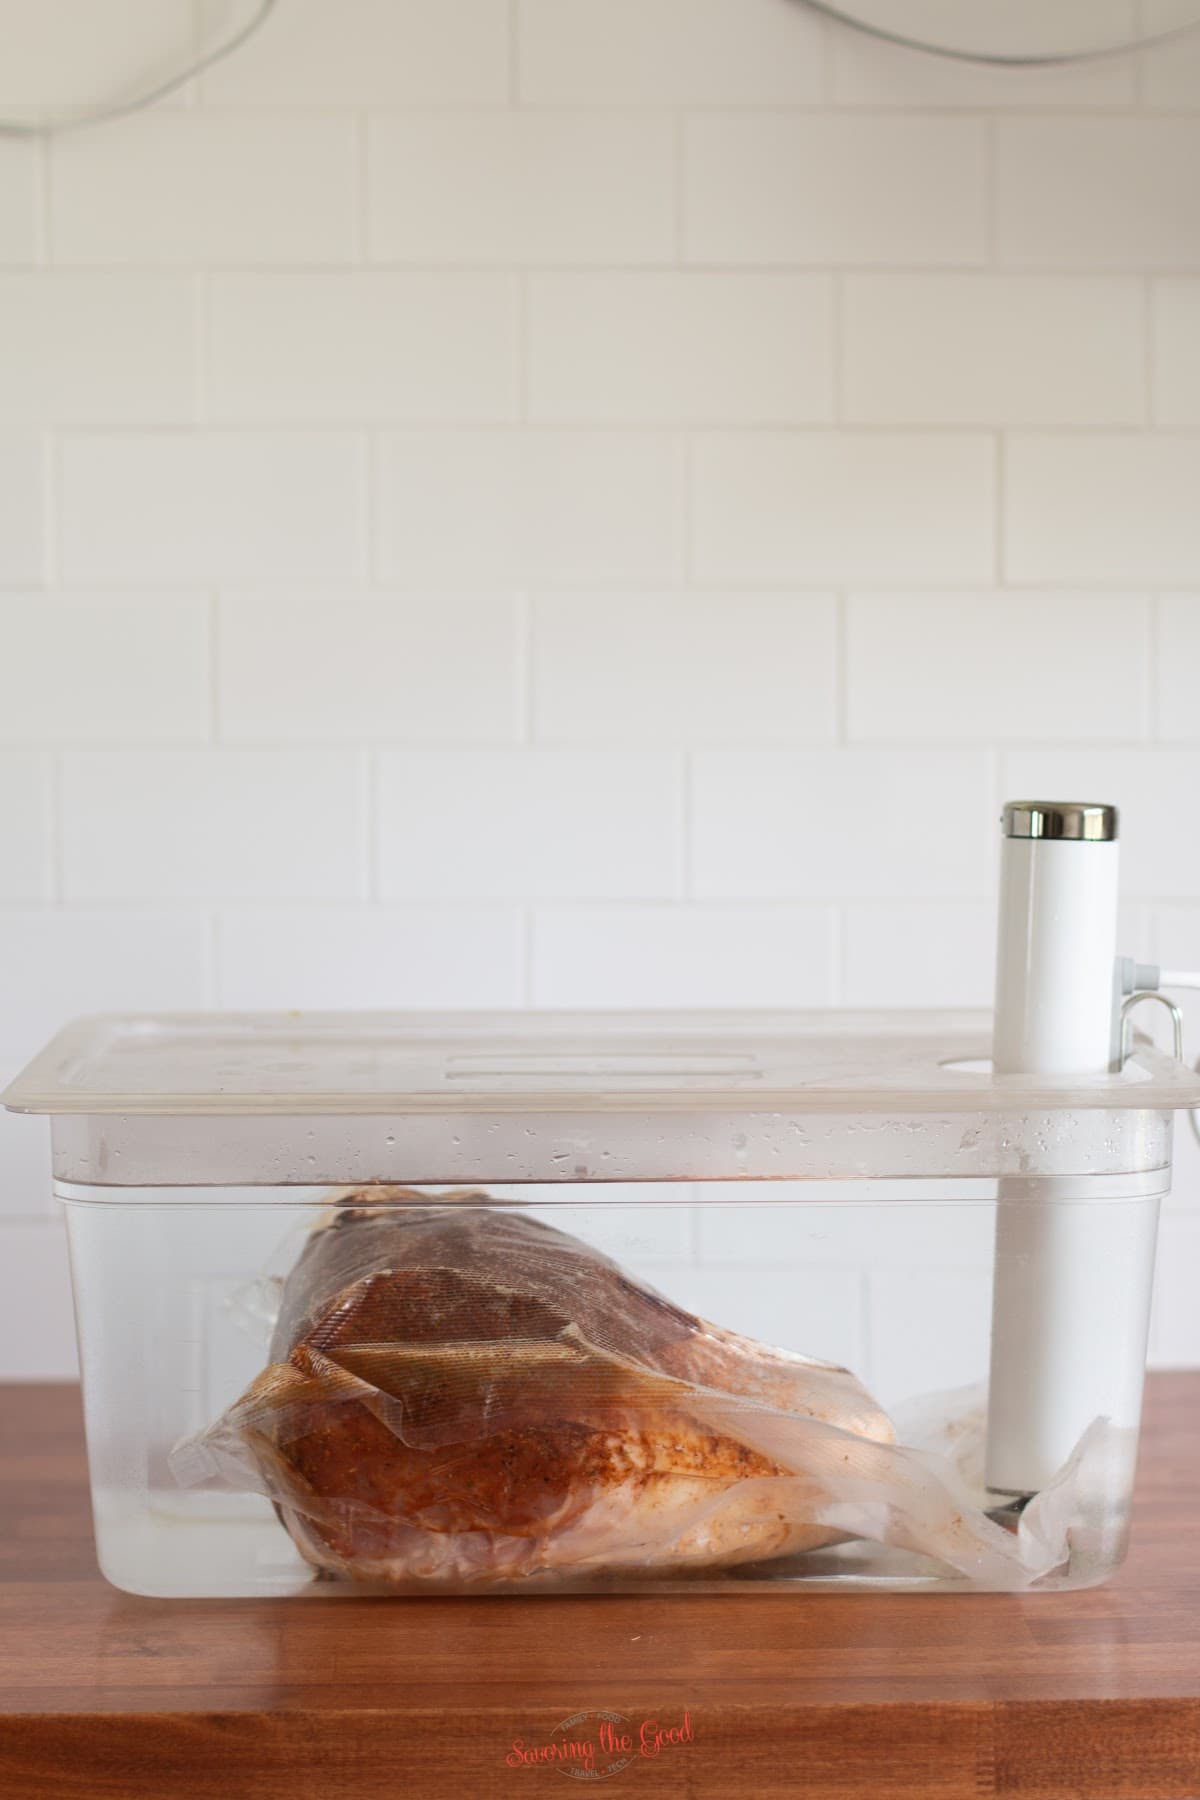
Cook for 24 hours
Submerge the sealed bag and clip it to the side of the container to keep it fully submerged. Cover with foil or a lid to limit evaporation. Check periodically to ensure the pork stays submerged and to top off water if needed.

Ice bath
When the cook completes, transfer the sealed bag immediately to a large bowl of ice water. Chill for 45 minutes minimum.
Food Safety Note
The ice bath step is not optional if you are making ahead as it stops the cooking process and rapidly drops the temperature for safe refrigeration.
Phase 3: The Finish
Prep for the finish
Remove the pork from the bag over a bowl and reserve all the juices from the bag, they are loaded with flavor and can be drizzled over the pulled pork at serving.
Second season
Pat the exterior of the pork completely dry with paper towels. Apply a fresh coat of dry rub to all surfaces.
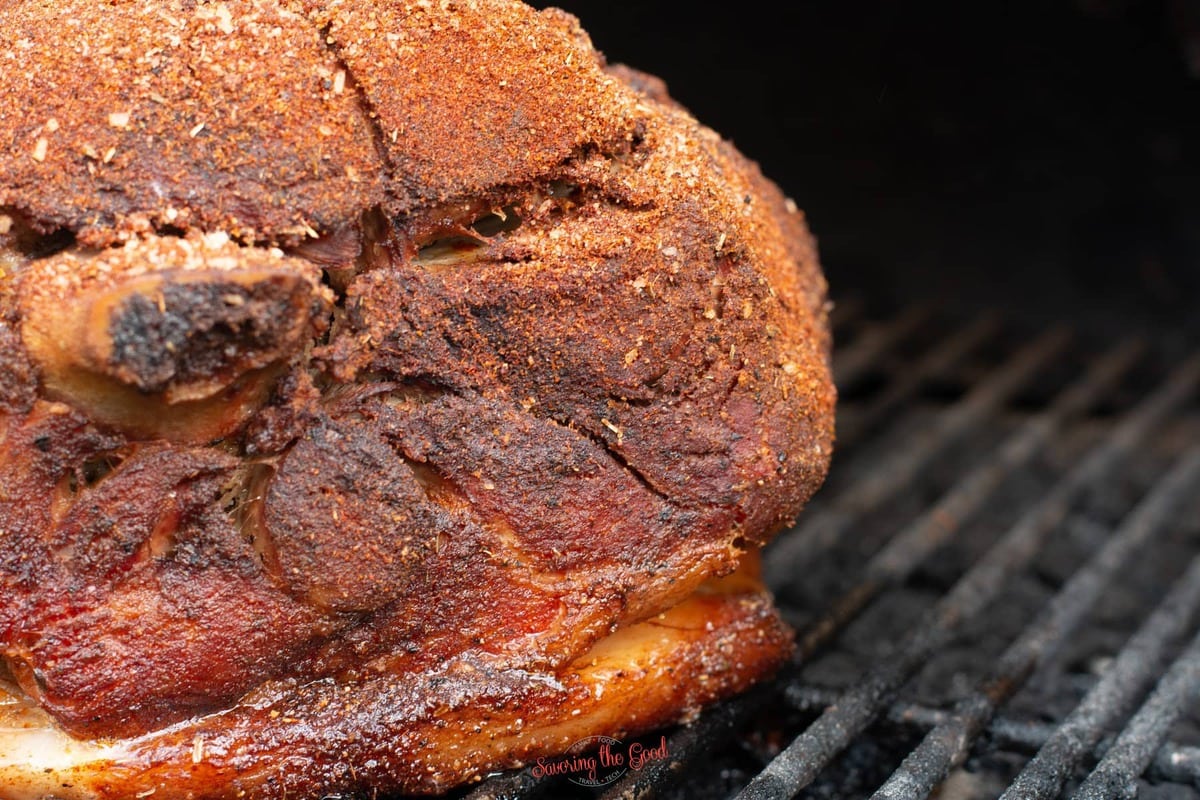
Finish in the smoker or oven
- Smoker: Set to 300°F with your preferred hardwood. Place the pork directly on the grate and smoke for 1.5-2 hours until a deep, mahogany crust forms on the exterior.
- Oven: Preheat to 300°F. Place the pork on a rimmed sheet pan and roast for 1.5-2 hours until a firm crust develops.

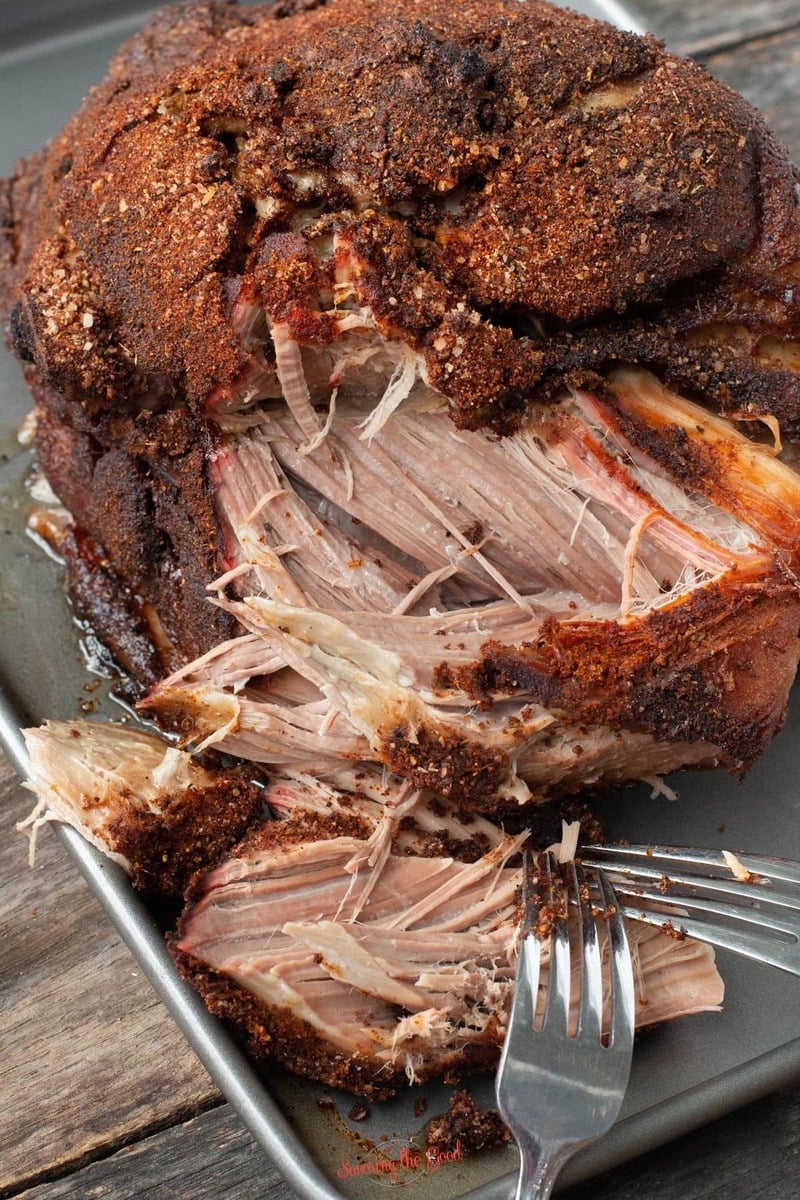
Pull and serve
- Remove the pork from the smoker or oven. If bone-in, the bone should slide out cleanly.
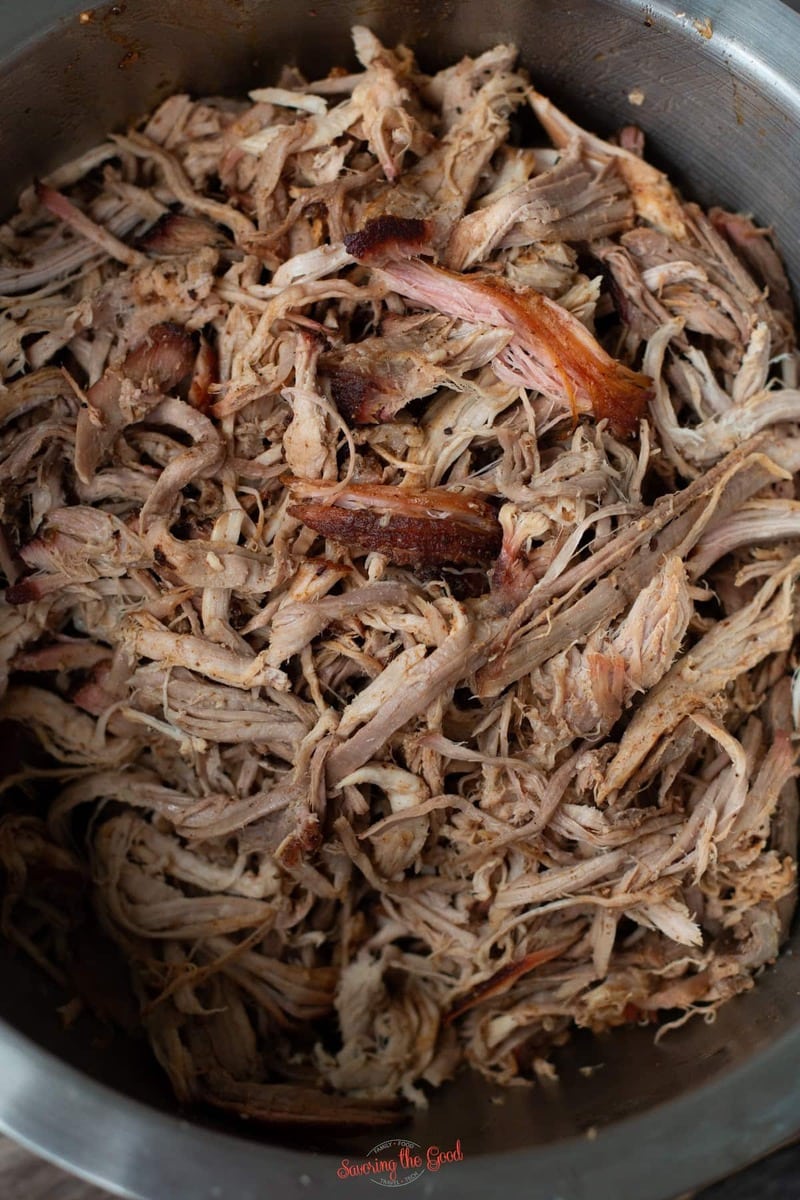
- Using two forks or heat-safe gloves, shred the pork into large, tender chunks.
- Drizzle the reserved bag juices over the pulled pork and toss to combine.
- Serve immediately.
Water displacement vs. vac and seal
I have found that using the water displacement method works well for either a bone-in or a boneless pork butt. This is my preferred method of sealing the bag when there is a bone in the meat. There is less chance of a puncture from the bone with water displacement vs. vac and seal.
Water displacement is when the pressure of the water forces the air out of the bag. To submerge your pork using the water displacement method:
- Place the meat in a heavy-duty, zip-top bag and close all but about 1 inch of the zip-top bag.
- Submerge the bag in the water allowing the pressure of the water to force the air out.
- Just as the water gets to the gap in the bag, close the bag.
If using a vac and seal bag, be sure to double seal the top and bottom seams because this will be a long cook. Look for a van and seal bag with a side gusset to help accommodate the larger piece of meat.
Seasonal Favorite

This is the best homemade seedless black raspberry jam recipe made with fresh or frozen black raspberries.
Make-Ahead Instructions
This is one of the best recipes to plan ahead, as the pork holds beautifully in the refrigerator for days, and having it ready means you can pull a crowd-feeding meal together in under 20 minutes.
- Complete the full 24-hour sous vide cook. Do not skip or shorten.
- Ice bath immediately. Do not open the bag. Transfer the sealed bag directly into a large bowl of ice water and chill for at least 45 minutes until completely cold. This is a critical food safety step - dropping the temperature rapidly stops any bacterial activity and locks in the juices.
- Refrigerate in the sealed bag for up to 5 days. All the juices stay contained in the bag, which means zero flavor loss.
- When ready to serve, remove the pork from the bag and reserve all juices. Pat the exterior dry. Apply a fresh layer of dry rub. Finish in the smoker at 300°F for 1.5-2 hours or in the oven at 300°F for the same time until a deep crust forms. Shred and serve.
Chef Tip
Cook multiple pork butts at the same time, cool one completely before freezing it and reheating and smoking at a later date.
Storage Instructions
Pulled pork is arguably better the next day, and it holds exceptionally well, which makes it a meal prep staple worth cooking in bulk.
- Refrigerator: Pulled pork keeps in an airtight container for up to 5 days. Store the reserved bag juices separately and add them back when reheating to restore moisture.
- Freezer: Freeze in airtight portions for up to 3 months. Portion before freezing so you can thaw only what you need.
- Reheating: Add the pulled pork to a covered skillet over medium-low heat with a splash of the reserved bag juices or a small amount of broth. Heat gently, stirring occasionally, until warmed through. As always, I avoid the microwave if possible as it dries the meat out unevenly. If you must microwave, cover loosely and heat in 30-second intervals, adding liquid between each pass.
- Unshredded (make-ahead in bag): The fully cooked, unshredded pork shoulder can be refrigerated in the sealed bag for up to 5 days before the finishing step. This is the preferred make-ahead method.
How to serve sous vide pulled pork
My favorite way to eat pulled pork is fresh off the grill. I love the smoke, the crust and the juiciness that is sous vide pulled pork. But my second favorite way is the serve it piled high on a toasted potato roll, a squeeze of BBQ sauce and a spoonful of coleslaw. But here are more way to serve sous vide pork shoulder:
- Pulled Pork tacos
- Pork buns - similar to bao buns but with pulled pork and more of a pizza roll crust instead of the bao dough.
- Pulled Pork grilled pizza - Follow my directions for grilled buffalo chicken pizza if you need simple grilled pizza directions.
- Macaroni and cheese topped with pulled pork - talk about a happy mouth! Creamy, cheesy mac and cheese balanced out with the smoky goodness of pulled pork.
- Pulled pork sliders - perfect for picnics or a packed lunch.
- Pulled pork bolognese - add another layer of flavor and texture by stirring in leftover pulled pork to your favorite bolognese
Great question and one that confuses a lot of people so I tell them to look at the science of the process.
Traditional smoking guides call for 190-205°F because at high heat, you need the meat to reach that internal temperature to break down the collagen into gelatin quickly. With sous vide, the meat holds at 165°F for 24 hours.
The extended time at a lower temperature accomplishes the same collagen breakdown without the rapid moisture loss that comes with high-heat cooking. The result is actually juicier than traditional pulled pork because the lower temperature drives out far less moisture over time.
For bone-in pork shoulder, yes and actually preferred for safety reasons. A vacuum sealer can be punctured by the bone during the sealing process.
Have I personally used a vacuum sealer for this recipe? Yes. Was I super cautious and watched the bone as I vacuumed? Also Yes.
Use a heavy-duty gallon freezer zip-top bag and the water displacement method to remove the air. At 165°F over 24 hours, monitor the bag periodically and reseal if any air works its way in.
Short answer: Temperature determines texture entirely.
At 145°F, the pork is tender and fully cooked but holds together and it slices cleanly and works well over rice, polenta, or served as a roast. At 165°F, the connective tissue breaks down more completely and the pork shreds apart into strands - classic pulled pork for sandwiches or tacos. Neither is wrong; it is entirely a texture decision based on how you plan to serve it.
My sister does not have a smoker and she tells me the oven works beautifully.
Preheat to 300°F, place the pork on a rimmed sheet pan, and roast for 1.5-2 hours until a firm crust develops on the exterior. To add some smoke flavor without a smoker, add smoked paprika and a small amount of liquid smoke (2 drops to start) to your dry rub before the sous vide cook.
Up to 5 days in the sealed bag, unshredded. This is my best make-ahead approach to do the 24-hour cook, ice bath the sealed bag, refrigerate, and finish in the smoker or oven within 5 days. The pork will actually develop slightly more flavor as it rests.
The most common cause is reheating without adding the reserved bag juices back in. Always save the liquid from the bag - it is concentrated pork flavor and moisture. When reheating, add it back into the pan with the pulled pork over medium-low heat. If you did not save the juices, a splash of chicken or beef broth works as a backup. Avoid the microwave if at all possible - it heats unevenly and drives out moisture fast.

Ingredients
- 1 4-5 lb Pork shoulder
- ¼ Cup Paprika
- 2 Tablespoon salt
- 2 Tablespoon Sugar
- 2 Tablespoon Brown Sugar
- 2 Tablespoon ground cumin
- 2 Tablespoon chili powder
- 2 Tablespoon Black Pepper freshly ground
- 1 Tablespoon cayenne pepper
Instructions
- Preheat the sous vide water bath to your preferred cooking temperature. My personal preference is 165°F / 74ºC for pull-apart, shreddable tender pork or use 145°F / 63ºC for pork that is tender but still sliceable.
- Coat the pork in your favorite dry rub. (see suggestions below)
- Place the coated pork in a vacuum seal bag.
- Submerge the sous vide bag in the water.
- Cook for 24 hours.
- Remove from the sous vide, remove from the bag, reserve the juices.
- Pat the meat dry, add another layer of dry rub.
- Smoke for 2 hours.
- Shred the pork.
Finishing in the smoker:
- Pat the meat dry with paper towels and apply another layer of spice rub.
- Use your favorite wood for smoking and set the smoker to 300.
- Smoke for 2 hours or until a delicious crust forms on the pork.
- Serve and enjoy!
Finishing the pork in the oven:
- Preheat the oven to 300.
- Pat the meat dry with paper towels and apply another layer of spice rub.
- Place the meat on a rimmed cookie sheet and cook for 1 ½-2 hours until a wonderful crust forms on the meat.
- Pull the pork for sandwiches.
Nutrition
Notes
- 1 tablespoon chili powder
- 1 tablespoon cumin
- 1 tablespoon ancho chipotle powder
- 1 tablespoon garlic powder
- 1 tablespoon kosher salt
- 1 tablespoon black pepper
- 1 teaspoon onion powder
- 1 teaspoon Mexican oregano
- 1 teaspoon crushed red pepper
- 1 teaspoon cayenne pepper
- ¼ cup light brown sugar
- 1 tbsp smoked paprika
- 1 tsp ground cayenne pepper
- 1 tsp chili powder
- 1 tbsp salt
- 1 tsp garlic powder
- 1 tsp onion powder
- ½ tsp ground black pepper
- 4 tablespoon kosher salt
- 4 tablespoon paprika
- 2 tablespoon black pepper
- 2 tablespoon garlic powder
- 2 teaspoon onion powder, toasted preferred
- 1 teaspoon ground celery seed
- 1 teaspoon dried oregano
- 1 teaspoon chipotle powder
- ¼ cup paprika
- 2 tablespoons salt
- 2 tablespoons white sugar
- 2 tablespoons brown sugar
- 2 tablespoons ground cumin
- 2 tablespoons chili powder
- 2 tablespoons freshly ground black pepper
- 1 tablespoon cayenne pepper

I am Sarah Mock. Welcome!
Sarah Mock is a classically trained Chef and a graduate of Johnson & Wales University. A culinary blogger for 17 years, Sarah helps the home cook prepare her recipes with professional results.


Sam says
I wanted to prepare something special for Mothers Day this year so I was very excited to find this recipe and all the positive comments/ratings. Unfortunately, having followed the recipe & method to the letter, the result was an incinerated pulled pork DISASTER! After 24h @ 165F in the sous vide the pork is COOKED. Adding more rub and checking after 1h (not 1.5-2hin the oven @ 300F resulted in a dry, inedible train wreck. A spectacular waste of time & money. Not to mention a disappointed wife & family who’d all come round for pulled pork rolls. AVOID
Sarah Mock says
Thank you for taking the time to leave a detailed comment. I am genuinely sorry your Mother's Day meal did not go the way you planned, and I want to help figure out where this went sideways.
A few questions that will help me understand what happened:
What cut of pork did you use, and was it bone-in or boneless?
And when you removed it from the bag after the 24 hours, did you reserve the bag juices before patting it dry and applying the second rub?
The reason I ask about the juices specifically: pork that finishes dry after sous vide almost always comes down to moisture loss either from the bag liquid being discarded or not being worked back into the shredded meat at serving. The sous vide bath itself should have kept every drop of moisture in full contact with the meat for the entire 24 hours.
I want to get to the bottom of this with you.
~Sarah
Sam says
Did my reply not find its way to you?
Hank says
Unbelievable tastes. Thanks for sharing
JR says
Hi, just finished it’s water bath. I’m wondering what you do with the juices?
Sarah Mock says
You can save the juices and make a sauce from them. cook a tablespoon of butter with a tablespoon of flour, add the juices and simmer till thick.
Will says
what type of bags are those? wondering what size I'll need for a 7.5lb pork butt
Sarah Mock says
Thanks for asking Will! I will add the gusseted bags to the recipe card as suggested equipment. The gusseted bags do take some adjusting to get them to lay flat in the sealer. I do suggest double or triple sealing, just to be sure.
Here is a link to amazon: https://amzn.to/3Bc6kvz
Rory Hanlin says
I just bought a new grill - super pumped! Appreciate the post - trying to learn as much as I can before the Spring is in full swing.
Sarah Mock says
What kind of grill did you get? I have a RecTec pellet grill and it is AH-mazing.
Debra Partridge says
You mentioned to reserve the juice from the pork. What do I do with it? Thanks!