


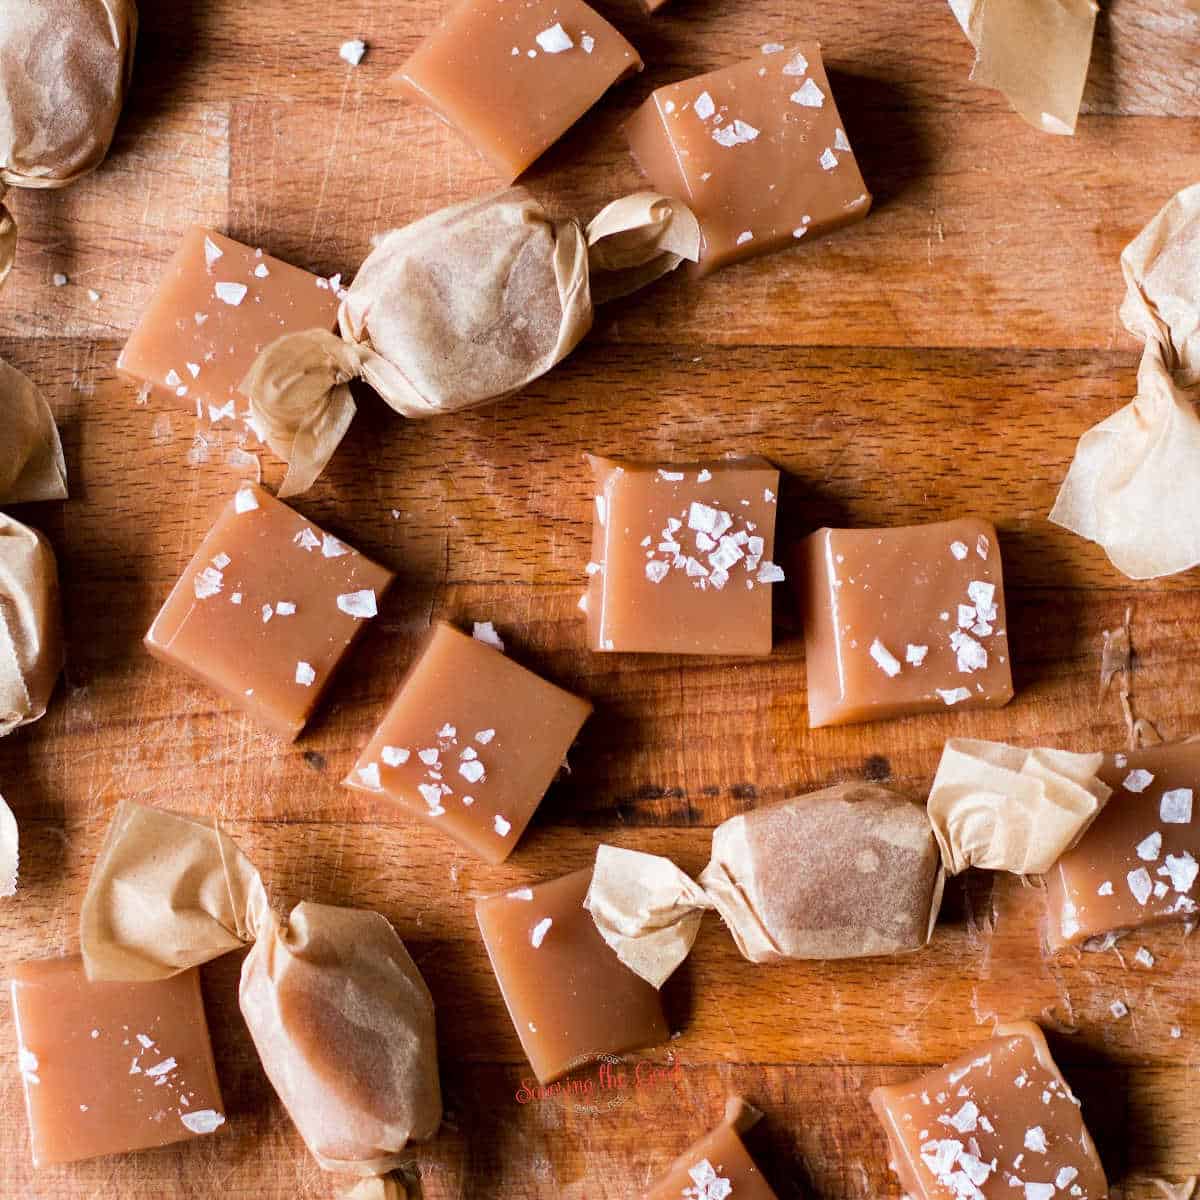
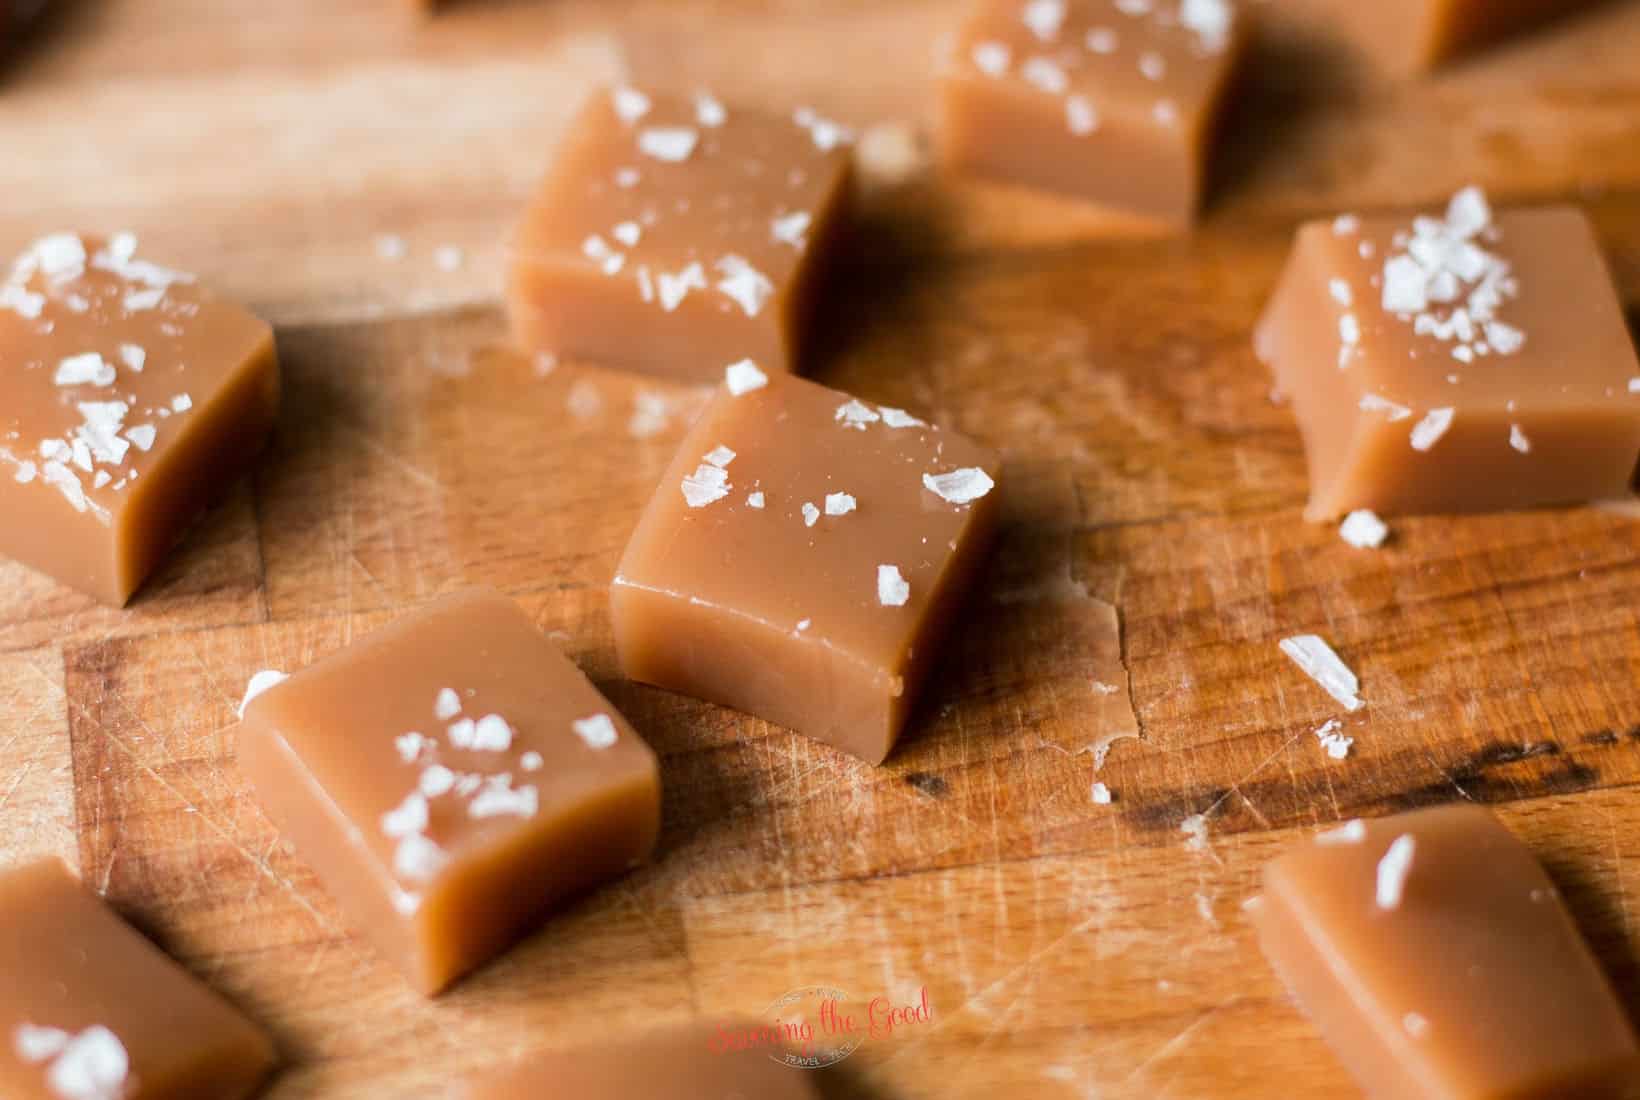
This recipe for caramels is buttery soft and chewy and topped with a sprinkle of sea salt. Caramels are one of the easiest candies you can make at home in under 30 minutes with just 4 ingredients.
Caramels were one of the recipes that I learned how to properly make in my first year of pastry school. I will share with you how to avoid getting crystals in your caramels and how to prevent the caramels from burning before you even pour them from the pan.
This recipe for caramel is a perfect gift to give during the holiday season. You can also give a jar of mulling spices that are just like what you can buy at William Sonoma.
I would like you to read the recipe through in its entirety before starting to cook the sugar to make the caramel. Boiling sugar can get away from you faster than you think. I want you to be prepared for the next step so you have caramel-making success.
Ingredients needed:
Helpful Kitchen Tools To Make Caramel
- Candy thermometer - I use a ThermPro thermometor but a traditional candy thermometer can be used.
- Silicone basting brush - used when washing down the sides of the pan from sugar crystals.
- Parchment paper - used to line the pan and to wrap the cut caramels. DO NOT use wax paper. You will not be happy.
How do you make caramels?
To successfully make caramels a bit of preparation needs to be done ahead of time to make this recipe. It may seem like the candy thermometer is taking forever and then the next thing you know you are ready to pour molten caramel and you need to move FAST.
Prepare your pan with a piece of parchment paper and be sure it is buttered on both sides. Fill a clean sink or large bowl with ice water so you can quickly shock the cooking candy and stop the caramelization process. Melt the butter and heat the cream while you bring the water, corn syrup and sugar to a rapid boil.
Once the temperature reaches 340, remove the pan from the heat and carefully add the melted butter and warm cream. Return it to the heat and whisk constantly until the temperature returns to 249. Plunge the bottom of the pan into the prepared ice bath to stop the cooking process and pour the hot caramel into the prepared pan.
Cool completely and cut into your desired shapes. Once cooled add sea salt for a garnish and wrap the pieces in wax paper or parchment paper.
How to make homemade caramels
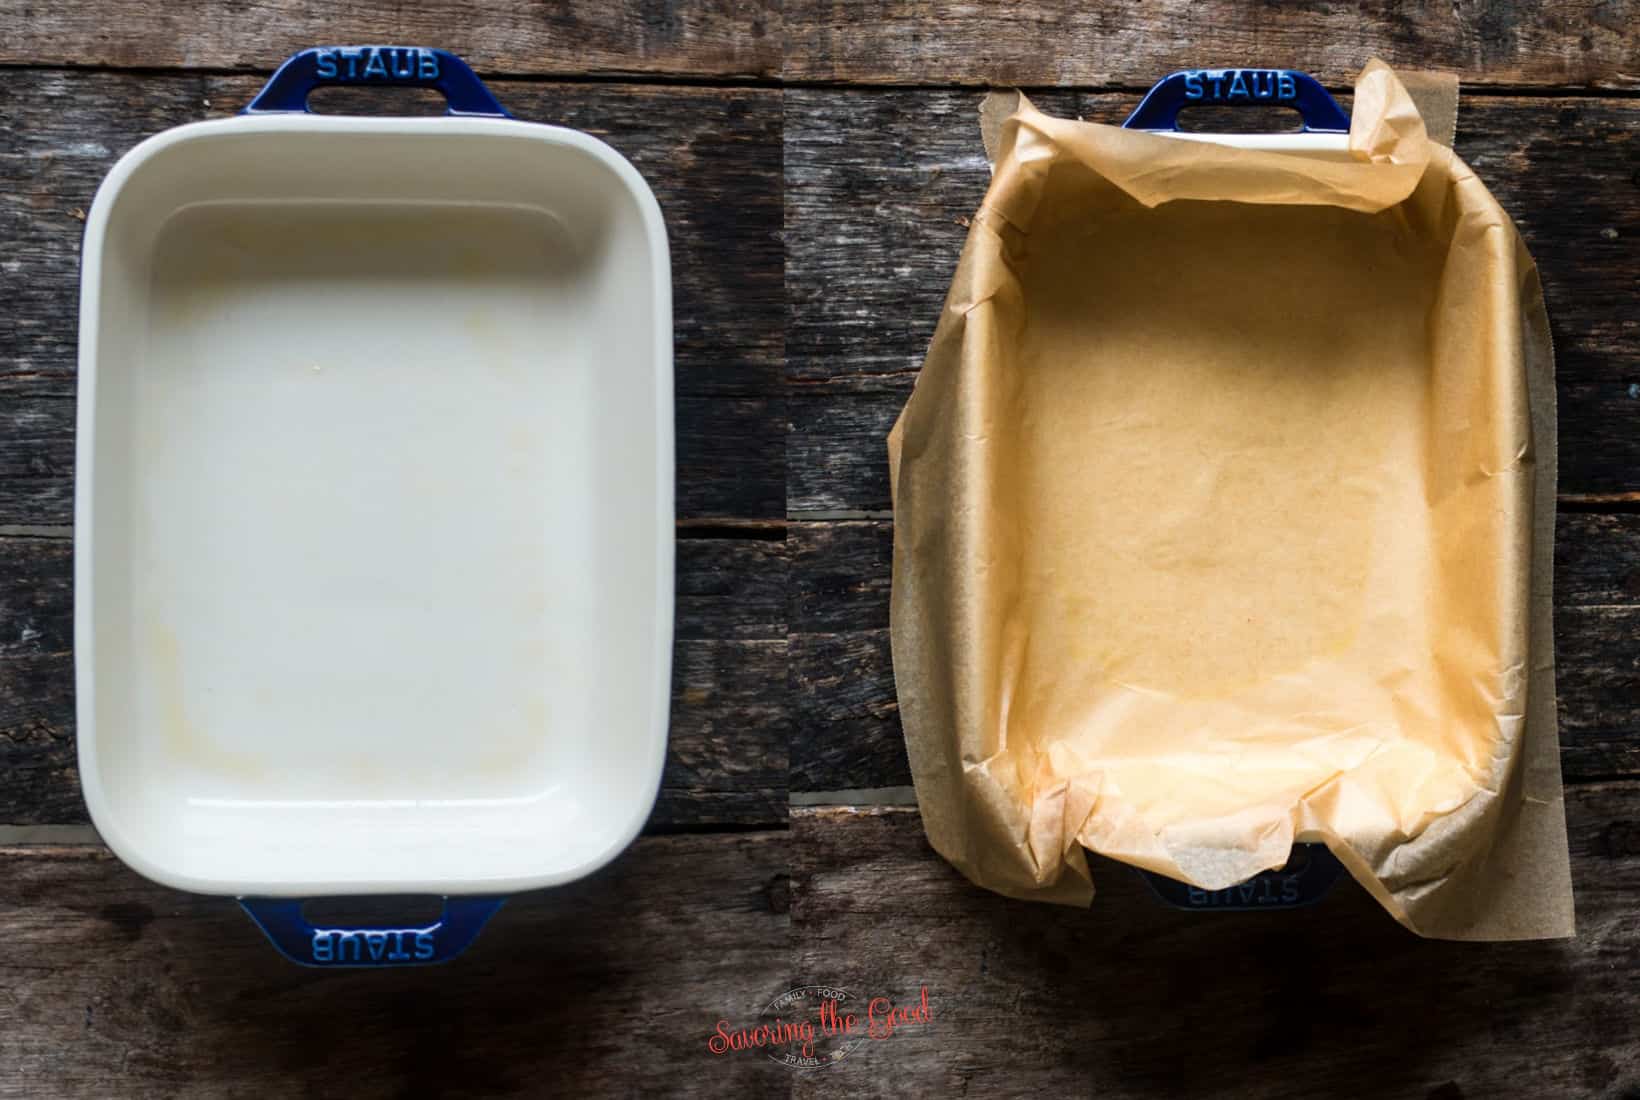
- Prepare the pan. Lightly brush the bottom of a 7.5" x 6" or loaf pan with a few drops of olive oil or melted butter. Press a piece of parchment paper into to pan, pressing the paper into the corners of the pan. The oil or butter will help keep the paper in place.
- Prepare a water bath - fill a clean sink with a few inches of water. This will be used to shock the caramel in later steps.

- Melt the butter - in a microwave-safe cup or bowl melt the butter and heat the heavy whipping cream for 1 minute. The warming of the butter and cream will help lessen the temperature extreme when the mixture is poured into the hot sugars.
- Cook the sugar - in a heavy bottom pan combine the water and corn syrup. Gently pour the sugar into the pan, keeping the sugar as close to the water as possible as not to allow the sugar to splash on the side of the pan.
- Add the thermometer - add the thermometer to the pan and bring the sugar to a boil. As the sugar starts to boil either cover it with a lid for 1 minute allowing the steam/moisture to fall back into the pan OR using the silicone pastry brush wipe the water on the sides of the pan to dissolve any sugar crystals. The sugar will start to take on a lovely caramel color around the edges. Boil until the thermometer reached 340 F.
- Add the cream and butter - AS SOON as the thermometer reaches 340 cut the heat off and SLOWLY pour in the heated heavy cream and butter mixture, gently whisking or stirring constantly. Be CAREFUL because there will be foaming of the hot sugar. Continue to SLOWLY pour the heated whipping cream and butter in a slow steady stream or pour the liquid into the pan in about 6 portions.
- Continue to cook - Turn the heat back on to medium heat and continually stir the caramel until it reaches a temperature of 245 degrees. This will give you a soft caramel that pulls a string when you take a bite. I like to continue to heat the caramel to 250. It takes on a lovely warm caramel color and is still soft but less sticky and fluid when eaten.
- Shock - this is something I learned in culinary school. The heat of the pan will continue to cook the sugar even after the heat is turned off. As soon you have reached your desired temperature or 245 or 250, immediately plunge the bottom of the pan into the prepared water bath. Just 5 seconds is needed. This will help stop the cooking process.
- Pour - immediately pour the caramel into the prepared pan. Allow the pan to cool for 30 minutes at room temperature on a flat surface. Then place the caramels in the refrigerator for 3-4 hours or until cool to the touch. I prefer to allow them to cool overnight.
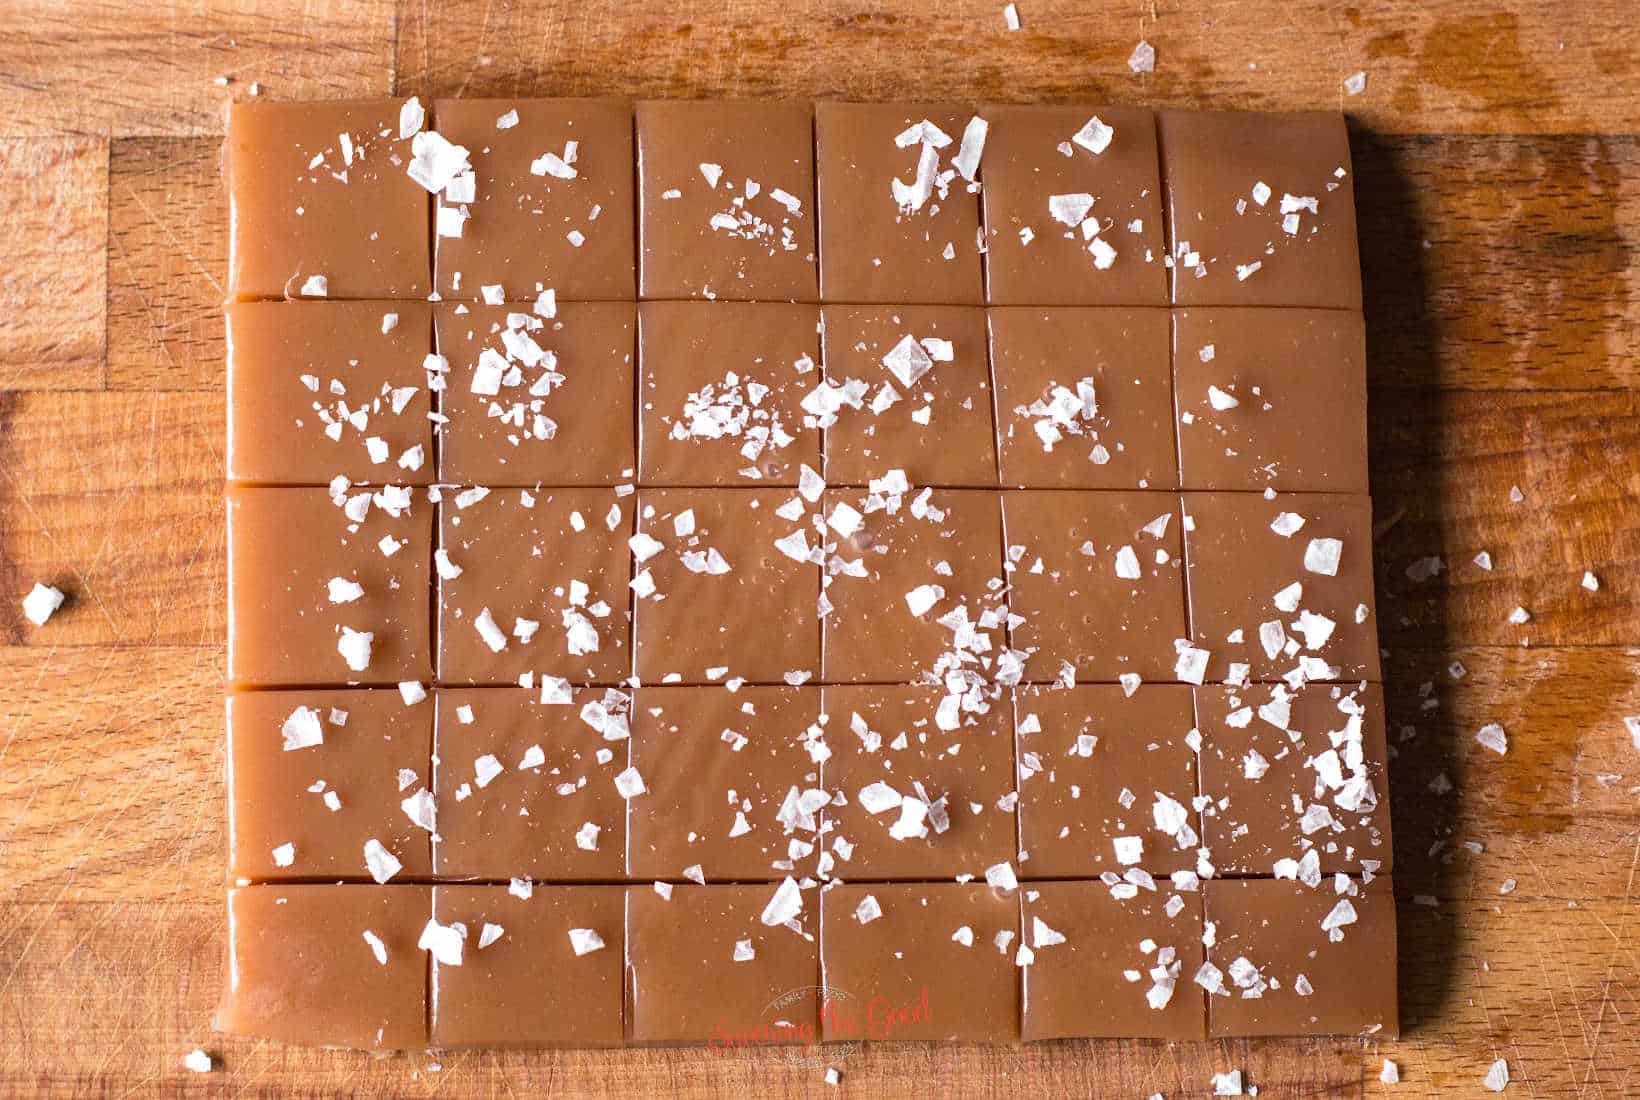
- Cut & Wrap - turn the slab on caramels out on a clean surface and using a ruler, mark out one-inch lines. Using a sharp long knife, press the knife into the caramels, cutting them into squares. Wrap in pieces of waxed paper.
- Salted Caramel - Sprinkle sea salt or another course flake salt over the caramels.


Storage Tips
Store cut unwrapped caramels on a closed serving dish in a single layer without the edges touching. Wrapped caramels can be stored at room temperature in their wax paper.
The higher the humidity, the stickier the caramel will be.
Clean up tip
Don't worry about scrubbing the sticky caramel out of the pan. Just add enough water to the pan to cover the caramel residue and bring the pan of water to a rolling boil. The sugars in the caramel will easily dissolve when the water boils making for easy clean-up. The thermometer can be cleaned at the same time.
Frequently asked questions, answers and tips:
If you have a granular caramel after it is cooled you probably had a grain of sugar or a piece of crystalized sugar drop back into the pan. Crystals will lead to more sugar crystals.
The key to preventing caramels from crystalizing is to prevent crystals in the first place. carefully pour the sugar into the pan, making sure that sugar doesn't cling to the side of the pan. Using a silicone brush dipped in water, wash down the sides of the pan allowing the sugars to dissolve back into the pan.
Another option would be to place a lid on the pan when the sugar first starts to boil. Allow the moisture to collect for one minute, and fall back into the pan. This should help dissolve any crystals that have formed on the edge.
Allow the caramel to cool completely in the pan and then run a knife around the edges of the pan to loosen the caramel.
Invert the pan onto a cutting board or flat surface and tap the bottom of the pan to release the caramel. Cut the caramel into desired sizes and shapes with a sharp knife.
If the caramel is still stuck to the pan, you can try placing the pan in a warm water bath for a few minutes to loosen it.
Chef Tip
I like to melt some chocolate and spread it in a thin layer on the back of the slab of caramel before cutting them into bite-sized pieces. Be sure the chocolate has set up completely before turning over and cutting.

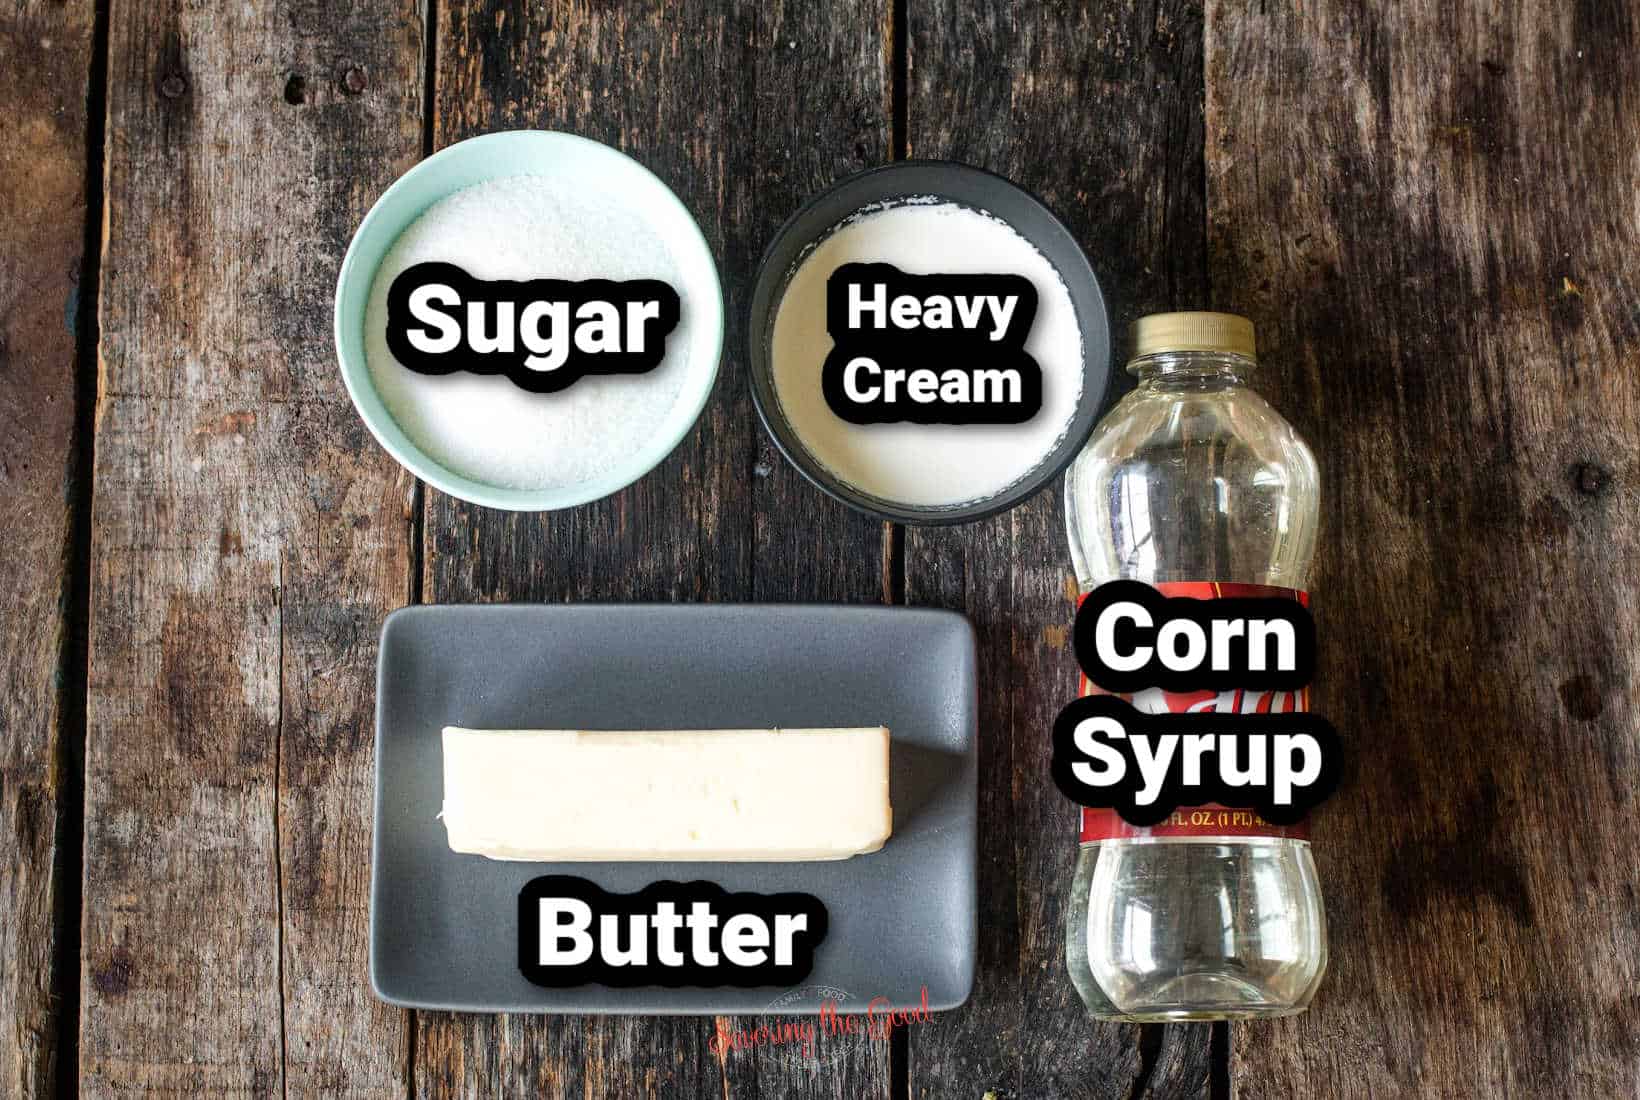
Ingredients
- ½ Cup (113 ½ Gram) Butter salted
- ½ Cup (119 Gram) heavy whipping cream
- ¼ Cup (85 ¼ Gram) corn syrup
- 2 Tablespoon (2 Tablespoon) Water
- 1 Cup (200 Gram) Sugar
- 1 Teaspoon (1 Teaspoon) sea salt
Instructions
- Pepare the pan. Lightly brush the bottom of a 7.5" x 6" or loaf pan with a few drops of olive oil or melted butter. Press a piece of parchment paper into to pan, pressing the paper into the corners of the pan. The oil or butter will help keep the paper in place.
- Prepare a water bath - fill a clean sink with a few inches of water. This will be used to shock the caramel in later steps.
- Melt the butter - in a microwave safe cup or bowl melt the butter and heat the heavy whipping cream for 1 minute. The warming of the butter and cream will help lessen the temperature extreme when the mixture is poured into the hot sugars.½ Cup (113 ½ Gram) Butter, ½ Cup (119 Gram) heavy whipping cream
- Cook the sugar - in a heavy bottom pan combine the water and corn syrup. Gently pour the sugar into the pan, keeping the sugar as close to the water as possible as not to allow the sugar to splash on the side of the pan.2 Tablespoon Water, 1 Cup (200 Gram) Sugar, ¼ Cup (85 ¼ Gram) corn syrup
- Add the thermometer - add the thermometor to the pan and bring the sugar to a boil. As the sugar starts to boil either cover with a lid for 1 minute allowing the steam/moisture to fall back into the pan OR using the silicone pastry brush wipe water on the sides of the pan to disolve any sugar crystals. The sugar will start to take on a lovely caramel color around the edges. Boil until the thermometer reached 340 F.
- Add the cream and butter - AS SOON as the thermoemter reaches 340 cut the heat off and SLOWLY pour in the heated heavy cream and butter mixture, gently whisking or stirring constantly. Be CAREFUL because there will be foaming of the hot sugar. Continue to SLOWLY pour the heated whipping cream and butter in a slow steady stream or pour the liquid into the pan in about 6 portions.
- Continue to cook - Turn the heat back on to medium heat and continually stir the caramel until it reaches a temperature of 245 degrees. This will give you a soft caramel that pulls a string when you take a bite. I like to continue to heat the caramel to 250. It takes on a lovely warm caramel color and is still soft but less sticky and fluid when eaten.
- Shock - this is something I learned in culinary school. The heat of the pan will continue to cook the sugar even after the heat is turned off. As soon you have reached your desired temperature or 245 or 250, emmeidately plunge the bottom of the pan into the prepared water bath. Just 5 seconds is needed. This will help stop the cooking process.
- Pour - imediately pour the caramel into the prepared pan. Allow the pan to cool for 30 minutes at room temparature on a flat surface. Then place the caramels in the refirdgerator fo 3-4 hours or until cool to the touch. I prefer to allow them to cool over night.
- Cut & Wrap - turn the slab on caramels out on a clean surface and using a ruler, mark out one inch lines. Sprinkle sea salt or another course flake salt over the caramels. Using a sharp long knife, press the knife into the caramels, cutting them into squares. Wrap in pieces of waxed paper.1 Teaspoon sea salt


Comments
No Comments