


Making a sourdough starter from scratch is easily made with just 3 ingredients and time. Follow my simple sourdough starter maintenance schedule so you can enjoy a fresh loaf of homemade sourdough bread whenever you want.
What is a sourdough starter?
Sourdough is the oldest leavener known in baking. Before we could purchase dry or cake yeast in the grocery store, bakers would create a sourdough starter consisting of flour water and wild yeast to leaven bread. This mixture was maintained and fed on a daily basis, shared with the community and passed on through generations.
Wild yeast is found in the air of most bakeries and home where flour is used but you can also see wild yeast in the form of the whiteish film on the surface of grapes. Using organic, fresh ground flour will also yield a higher percentage of wild yeast as these products are not stripped down, bromated, de-braned and enriched.
But do not worry if you are not sure if there is yeast in your environment. A pinch and I mean a pinch, of dry or cake yeast will go a long way. It will give the starter the jump that it needs to get growing and then the natural yeasts in your environment will take over.
Bonus flavors for making a starter
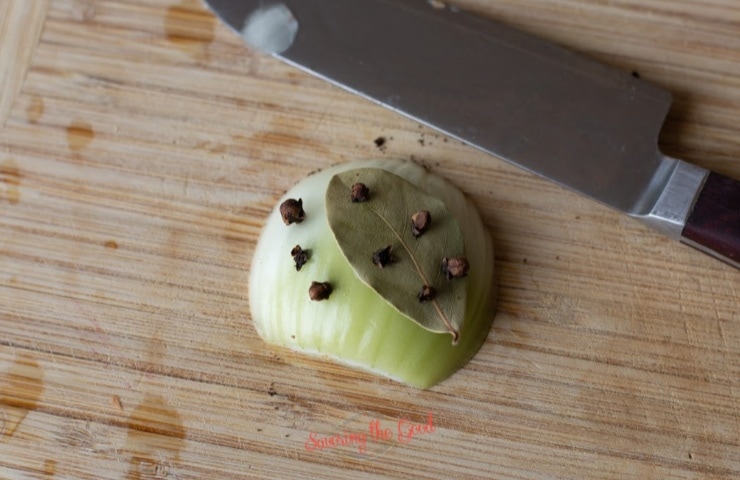
One of the greatest tips I got from my Chef instructor at Johnson & Wales University when it comes to making a flavorful sourdough is to add a piece of an onion studded with cloves and a bay leaf. Just cut a piece of onion, as seen above, lay a bay leaf on it and press a few cloves into the bay leaf.
The onion will give an extra layer of tang and the cloves and bay leaf will give it layers of savory flavor. This step is completely optional but I wanted to share my little sourdough starter secret with you. Also, you will be seeing the onion in the following photos.

How to make a fermented sourdough starter from scratch
Recipe Card?
To find the full printable recipe with specific measurements and directions CLICK HERE to go to the recipe card.
Baking is a science and ingredients should be weighted, including water, for best results. But I know that every home baker does not own a scale so I will include both the weigh amounts as well as the dry measure amounts. This is such a small scale recipe that it will be very forgiving.
Day 1 of starter

- In a quart jar with a lid whisk together:
- ½ cup spring water (4 ounces)
- ⅔ cup flour (3 ounces)
- Pinch of dry yeast (less than 1/16 of a teaspoon) told you it was just a pinch!
- Using a rubber spatula, scrape down the sides and place the lid on the jar.
- Store in a moderately warm place for 24 hours (74-80 F is ideal but countertop or on top of the refrigerator will also work)
Day 2 of starter
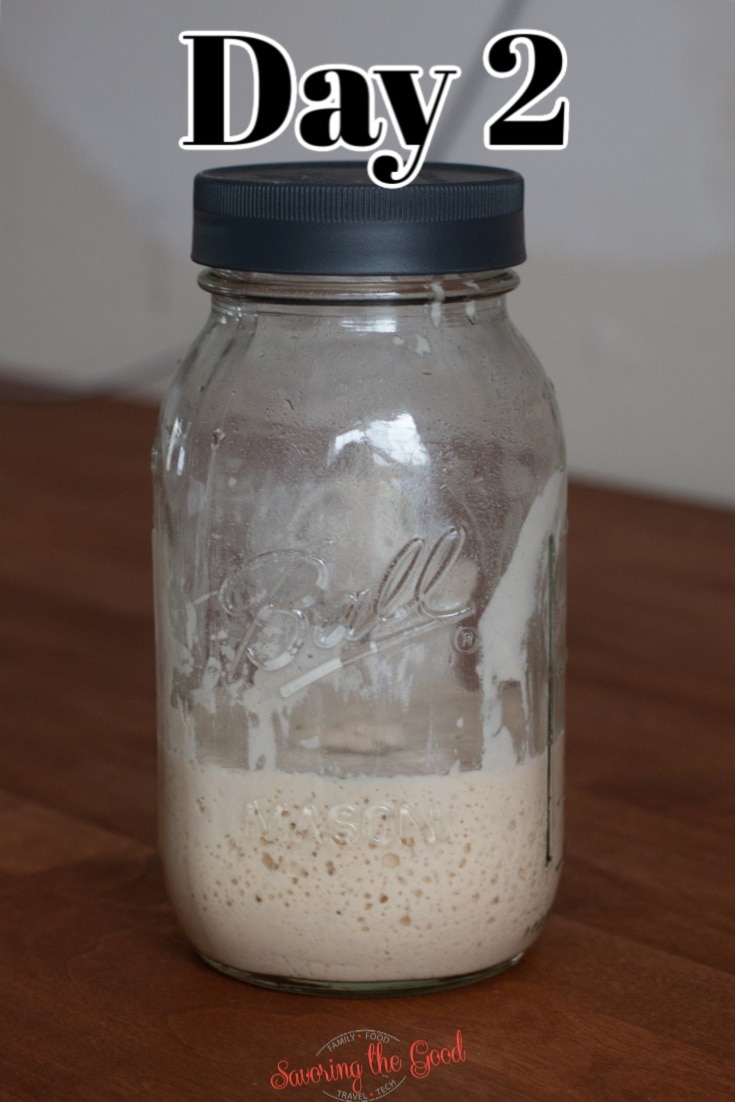
Open your container and observe the starter. It should show some signs of growth and have a sweet yet musty smell. You are welcome to take a little taste to see if it is starting to take on a tangy taste that sourdough is known for.
- To the jar whisk in:
- ½ cup spring water (4 ounces)
- ⅔ cup flour (3 ounces)
- Stir vigorously to incorporate fresh oxygen, the water and flour.
- Using a rubber spatula, scrape down the sides and place the lid on the jar.
- Store in a moderately warm place for 24 hours (74-80 F is ideal but countertop or on top of the refrigerator will also work)
Day 3 of starter

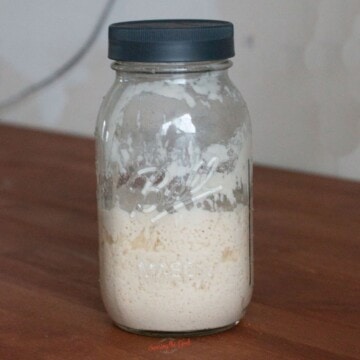
There should be BIG changes in the jar when you look at it. You will be able to see bubbles on the surface and if you are using a clear container, you should be able to observe different sizes of bubbles in the starter. The starter is now alive and thriving. If you would like to see more, insert a spoon into the mass, pull up and you should see short glutenous strands sticking to the spoon.
- Time to feed the starter:
- Add ½ cup spring water (4 ounces)
- ⅔ cup flour (3 ounces)
- Stir vigorously to incorporate fresh oxygen, the water and flour.
- Using a rubber spatula, scrape down the sides and place the lid on the jar.
- Store in a moderately warm place for 24 hours (74-80 F is ideal but countertop or on top of the refrigerator will also work)
Seasonal Favorite

This is the best homemade seedless black raspberry jam recipe made with fresh or frozen black raspberries.
Day 4 of starter
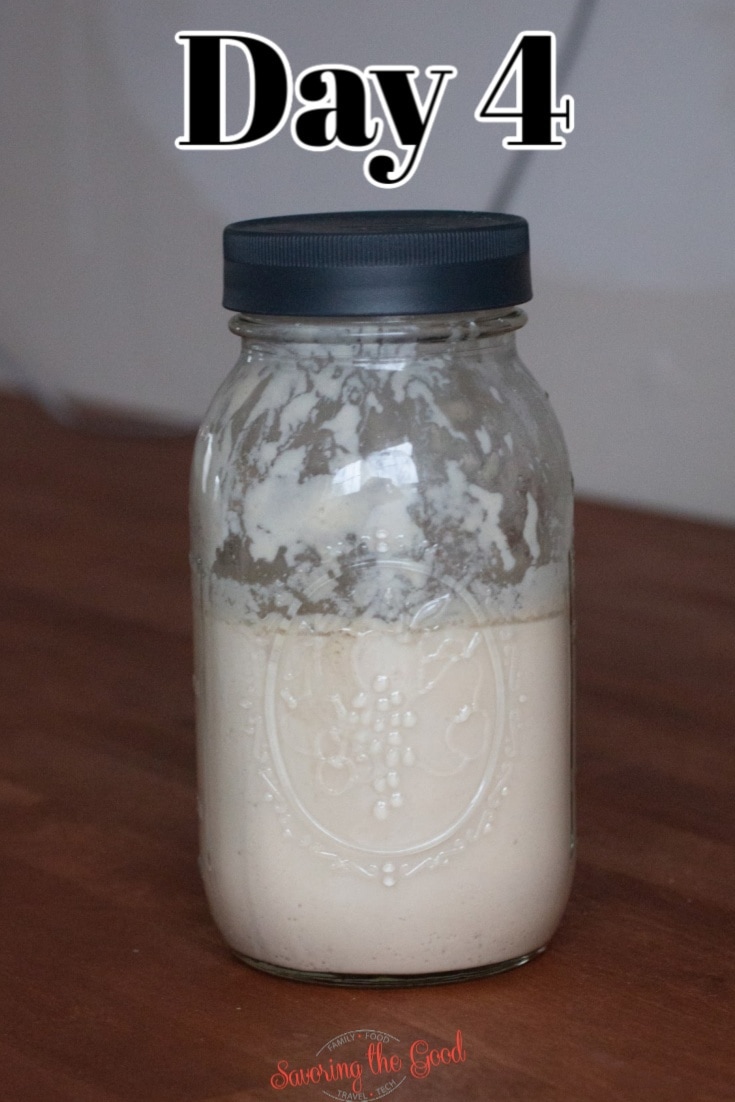
On day 4 of the starter fermentation, the sourdough starter is just about ready to be used to make a sourdough loaf of bread. Day 4 will also have the starter double in size from day 3. This is why you need at least a quart-sized container. The starter will have a well-established honeycomb structure of large and small bubbles. If you taste the starter, it will have a tangy, sour flavor but it should not be bitter.
- One last time add:
- ½ cup spring water (4 ounces)
- ⅔ cup flour (3 ounces)
- Stir vigorously to incorporate fresh oxygen, the water and flour.
- Using a rubber spatula, scrape down the sides and place the lid on the jar.
- Allow the starter to mature 8 more hours.
- If not using right away, store in the refrigerator for up to 3 days, until you are ready to make bread.
Frequently asked questions, answers and tips:
Start a sourdough starter by combining flour, water and a pinch of yeast. Stir vigorously, cover and let set in a room temperature place for 24 hours.
Allow yourself 4 days to propagate a proper sourdough starter, longer if you want a more developed flavor profile but 4 days will get you started. In keeping with the old saying 'good things come to those who wait', waiting on a starter will be well worth the wait. There are approximately 40 BILLION cells in 2 ounces of yeast.
When undisturbed in a moist environment and kept at a temperature of 75-80 degrees they will continually eat and reproduce every half hour. As they reproduce they will produce carbon dioxide and alcohol. Basically they are eating sugar (the protein in the flour) and 'farting' and getting drunk. It is a party in the starter.
You will want to use a grain-based flour for your starter. Bread flour, rye flour, whole wheat flour, barley flour, all-purpose flour and unbleached flour all are good choices. As stated above, organic is great if you want to try and develop your starter from wild yeast.
You may notice that there is a bit of liquid laying on top of your starter. I stir it back in for a more intense flavor. You are welcome to pour it off before feeding the starter, but in truth, there is no reason for this extra step.
I like to keep my starter in a glass mason jar with a screw-top lid, but with the lid placed, not screwed ontop. But any nonreactive container with a lid will work. Glass, ceramic or stainless steel are all options.
I suggest spending a dollar or two to purchase a gallon of spring water from the grocery store. Note that spring water is different than distilled water. Your tap water may have been treated with fluoride and purifiers and while these treatments can be good for human consumption, they can be bad for yeast propagation.
The jar should not be airtight. Simply place the lid on the jar or even cover it with a clean towel to keep stuff out of the starter. Starters need to 'breathe' and will be doubling in volume each day. There is a slight chance of a jar cracking if the lid is too tight due to the pressure of the carbon dioxide build-up.


Ingredients
- 1/16 Teaspoon dry yeast
- 4 Cups spring water divided
- 2 ⅔ Cups Flour, All Purpose divided
Instructions
Day 1 of starterIn a quart jar with a lid whisk together:
- ½ cup spring water (4 ounces)4 Cups spring water
- ⅔ cup flour (3 ounces)2 ⅔ Cups Flour, All Purpose
- Pinch of dry yeast (less than 1/16 of a teaspoon).1/16 Teaspoon dry yeast
- Using a rubber spatula, scrape down the sides and place the lid on the jar.
- Store in a moderately warm place for 24 hours (74-80 F is ideal but countertop or on top of the refrigerator will also work)
- Day 2 of starterOpen your container and observe the starter. It should show some signs of growth and have a sweet yet musty smell. You are welcome to take a little taste to see if it is starting to take on a tangy taste that sourdough is known for.
To the jar whisk in:
- ½ cup spring water (4 ounces)
- ⅔ cup flour (3 ounces)
- Stir vigorously to incorporate fresh oxygen, the water and flour.
- Using a rubber spatula, scrape down the sides and place the lid on the jar.
- Store in a moderately warm place for 24 hours (74-80 F is ideal but countertop or on top of the refrigerator will also work)
- Day 3 of starterThere should be BIG changes in the jar when you look at it. You will be able to see bubbles on the surface and if you are using a clear container, you should be able to observe different sizes of bubbles in the starter. The starter is now alive and thriving. If you would like to see more, insert a spoon into the mass, pull up and you should see short glutenous strands sticking to the spoon.
Time to feed the starter:
- Add ½ cup spring water (4 ounces)
- ⅔ cup flour (3 ounces)
- Stir vigorously to incorporate fresh oxygen, the water and flour.
- Using a rubber spatula, scrape down the sides and place the lid on the jar.
- Store in a moderately warm place for 24 hours (74-80 F is ideal but countertop or on top of the refrigerator will also work)
- Day 4 of starterOn day 4 of the starter fermentation, the sourdough starter is just about ready to be used to make a sourdough loaf of bread. Day 4 will also have the starter double in size from day 3. This is why you need at least a quart-sized container. The starter will have a well-established honeycomb structure of large and small bubbles. If you taste the starter, it will have a tangy, sour flavor but it should not be bitter.
One last time add:
- ½ cup spring water (4 ounces)
- ⅔ cup flour (3 ounces)
- Stir vigorously to incorporate fresh oxygen, the water and flour.
- Using a rubber spatula, scrape down the sides and place the lid on the jar.
- Allow the starter to mature 8 more hours.
- If not using right away, store in the refrigerator for up to 3 days, until you are ready to make bread.
Nutrition
Notes
Sourdough starter tips:
- Do you stir sourdough starter before using?
- What is the best container to keep the sourdough starter in?
- Does the type of water make a difference in the starter?
- Should the jar be airtight?

I am Sarah Mock. Welcome!
Sarah Mock is a classically trained Chef and graduate of Johnson & Wales University. A culinary blogger for 15 years Sarah helps the home cook prepare her recipes with professional results.


Rita says
What are the instructions for refrigerating and keeping it alive once you have the starter going??