

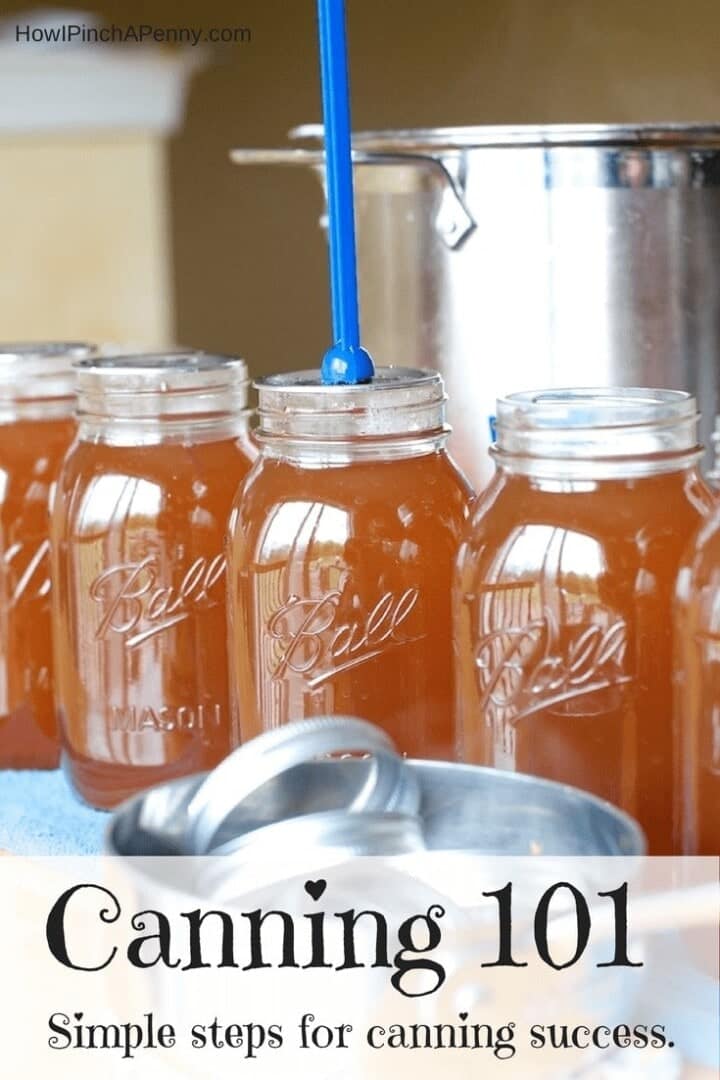
A popular preserving method is canning. Canning heats the food, kills any microorganisms and creates a seal on a glass jar. Here is canning 101 or as I like to call it, canning for beginners. Learn about canning equipment, canning safety tips as well as canning dos and don'ts. Simple steps for canning success.

Canning 101. Simple steps for canning success.
Canning Equipment Basics
- Canning Jars Be sure they are canning jars. Glass jars do not = canning jar.
- Lids. These can not be reused from batch to batch. Get new lids.
- Rings These are used to keep the lids tight to the jars are they process in the hot water bath.
- Wide-Mouth Funnel Great for getting your product IN the jar...not on the counter
- Lid Wand This is essential for safely getting the sterilized lids on the jars with out burning your finger tips!
- Ladle Needed to get your hot water, pickling liquid or juice in the jars. (A heat safe mug can be used in a pinch)
- Clean Cloth These are used to wipe the rim of the jar before the lid is applied.
- Large Pot A large pot that can accommodate canning jars PLUS 1-2 inches of water.
- Tongs or Jar Lifters are ESENTIAL for getting the jars out of the simmering water.
Simple steps to water bath canning.
- Sterilize the jars
- Cut produce and fill the jars
- Fill with boiling water, pickling liquid or juice.
- Wipe jar rims, add a FRESH lid and a ring.
- Process in a hot water bath for the recommended time.
- Remove from the water bath.
- Allow to cool completely.
- Check for loose lids.
5 Days To Canning Confidence
Canning Benefits:
- Less wasted food.
- No preservatives.
- You can customize your flavors.
- Saves money.
- Delicious food!
Home canning tips and cautions from Ball Brand Canning
Home canning is one part art and a whole lot of science. Safety is of the utmost importance when canning. Here are some do's and don'ts when it comes to home canning. These tips come right from Ball Jar.
Canning Preparation Tips
- Follow a tested/approved recipe for home canning.
- Follow a tested/approved recipe completely.
- Hand wash closures.
- Clean jars prior to use.
- Make sure your canning pot is tall enough to cover the jars by 1-2 inches of water.
- Use the appropriate canner for your stovetop.
- Use a canning rack, trivet, or bands to place the jars on top of in the pot/canner.
Canning Safety Tips
- Place hot jars on a towel or wooden cutting board to fill. (It keeps them from shifting)
- Remove one jar, fill jar, then place jar into canner before filling the next jar.
- Measure your headspace according to what's indicated in the recipe.
- Remove air bubbles with a plastic utensil.
Seasonal Favorite

This is the best homemade seedless black raspberry jam recipe made with fresh or frozen black raspberries.
Canning Lid and Ring Safety Information
- Wipe the rim of the jar with a damp cloth or paper towel to remove food particles.
- Use a two-piece closure.
- Adjust the band to finger-tip tight.
- Adjust processing time for altitude.
- Start the processing time when the water begins to boil or pressure achieved.
- Allow jars to cool in canner for 5 minutes after processing before removing.
- Place preserved jars on a towel or wooden cutting board spaced 1-2in apart to cool.
Safety Tips For Storing Canned Goods
- Allow jars to cool for 12-24 hours before checking the seal.
- Remove band, ensure lid is concave, & verify the lid is sealed before storing.
- Clean jar prior to storing.
- Store jars in a cool/dry/dark location between 50-70 degrees.
- Use freezer-safe jars when freezing. (Tapered)
Canning Preparation Don'ts
- Use an outdated recipe or untested recipe.
- Alter recipe ingredients, processing method, or processing time.
- Use a jar size larger than indicated in the recipe.
- Clean closures in a dishwasher.
- Use jars straight from the case.
- Use a pot that is too small for your jars.
- Assume you can preserve on all stove-tops.
Canning Safety Don'ts

- Place the jars directly on the bottom of the pot/canner.
- Place hot food in room temperature jars.
- Place hot jars on a cool counter-top or anything metal.
- Assembly line fill your jars. (Aka fill them all at the same time.)
- Guess on the headspace.
- Forget to remove air bubbles or use a metal utensil to remove air bubbles.
Canning Lid and Ring Safety Don'ts
- Forget to wipe the rim.
- Use antique or one-piece closures.
- Crank the band on the jar super tight.
- Forget to adjust processing time for altitude.
- Start processing time when the last jar is loaded into the pot/canner.
- Remove jars immediately after processing or force pressure to come down.
- Don't place hot jars directly onto a counter top or metal surface.
Cautions For Storing Canned Goods
- Don't forget to check your seal.
- Don't forget to wipe the jar down before storing.
- Store jars in very hot or very cold locations is not advisable.
- Use jars that are not freezer-safe when freezing. (Jars with "shoulders")
Additional note: These are basic steps and more specific steps would be taken depending on what is being canned.
Canning on a glass top stove tip:
- Ensure the glass stovetop is safe for home canning.
- Use a pot that is completely smooth on the bottom & will come in complete contact with the heating element.
- The bottom of the pot must not exceed the burner by more than 1 inch.
For more techniques and recipes for canning be sure to visit the canning section.
this post originally appeared Aug 22, 2014

I am Sarah Mock. Welcome!
Sarah Mock is a classically trained Chef and graduate of Johnson & Wales University. A culinary blogger for 15 years Sarah helps the home cook prepare her recipes with professional results.


Comments
No Comments