

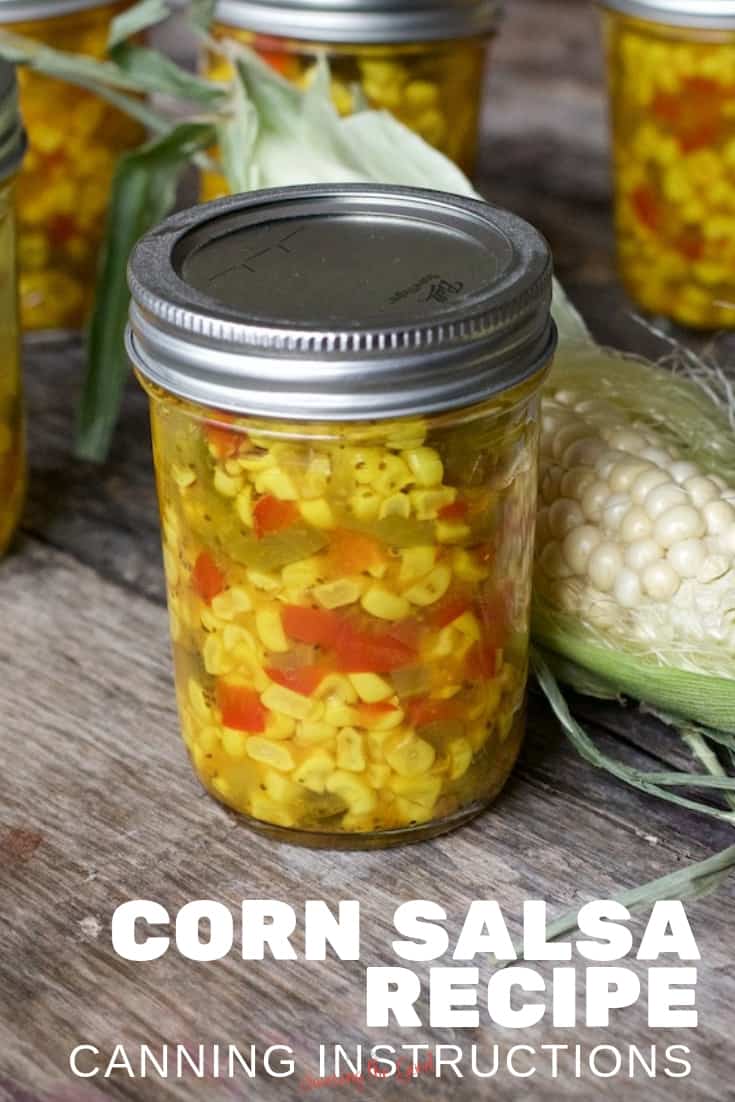
This corn relish recipe is a delicious combination of corn kernels, red and green bell peppers, celery, onions, vinegar, sugar and spices simmered to marry these fresh flavors together. This homemade relish relish is a delicious way to make your meals zesty.

Serve right away or follow the easy recipe for canning corn relish to enjoy your corn relish all year long.
I'm using freezer corn when I can't find fresh and any leftover corn will go to make corn and crab fritters. Corn lovers will want to also make Mexican corn dip, Mexican corn casserole and sous vide corn on the cob.
Explore the recipe below and let the corn take center stage.
What is in homemade corn relish recipe:

Recipe Card?
To find the full printable recipe with specific measurements and directions CLICK HERE to go to the recipe card.
- white vinegar
- sugar
- salt
- corn kernels, cooked
- mixed red and green bell peppers
- celery, diced
- onion, finely chopped
- dry mustard
- celery seeds
- turmeric, ground
What supplies do I need to get started with the canning recipe?
If you are new to home canning corn relish, the Ball® 9 Piece Preserving Starter Kit is perfect for the aspiring canner. It includes all of the necessary tools for canning (excluding common kitchen equipment) and a recipe card with step-by-step visual and written instructions that make learning the canning process as easy as possible.
5 Days To Canning Confidence
How To Make Corn Relish
- In a large canning pot, heat the canning jars and lids in simmering water until ready for use. Do not boil. Set bands aside.

- In a large stainless sauce pan, combine the vinegar, sugar and salt and bring to a boil, stirring to dissolve sugar. Place the corn, red peppers and green peppers, celery, onion, mustard, celery seeds and turmeric in the pan.
- Reduce the heat and simmer 15 minutes, stirring frequently.

Canning Corn Relish

- Ladle the tangy hot relish into hot jars leaving ½ inch headspace.
- Remove air bubbles and wipe the rim of the jar with a clean damp towel. Center hot lid on jar. Apply band and adjust until fit is fingertip tight.
- Process the relish-filled jars in a hot water bath. Repeat until all jars are filled.
- Once the sterilized canning jars are all filled and in the water canner process them for 15 minutes, adjusting for altitude.
- Turn off heat; remove lid and let jars stand 5 minutes in room temperature. Remove jars and cool.
- Check lids for seal after 24 hours. The sealed jars should not flex up and down when center is pressed.
Did you make this recipe?
Do you have feedback that would be helpful to others? If so can help this small business owner by leaving a rating and a review in the comments section? Thank you for being part of the Savoring The Good Community. ~ Sarah
Storage Tips to Make Your Corn Relish Last
Once the lid has been popped, the jar is no longer shelf-stable. To store the opened jar you can use the lid and close with the ring and refrigerate. Or use one of Ball® Canning Leak-Proof Storage Lids. These BPA free plastic lids feature an airtight seal, and are also perfect for baby food, herbs, spices, and food on-the-go.
Ways to Use Corn Relish
Using corn relish is a delicious way to use in a variety of dishes; add the corn to bring a sweet crunch. It's also a great way to infuse a tangy flavor, as demonstrated in this corn relish bruschetta. All the ingredients are in your pantry shelf.
- Toast slices of baguette until golden brown,
- Spread a layer of cream cheese on each slice, and
- Top it with a spoonful of corn relish.
For optimal freshness, the corn relish can be stored in the refrigerator.
Can I make sweet corn relish using this recipe?
Yes, you can create a homemade sweet corn relish using the recipe. The pantry ingredients, including ground cumin, can improve the flavor a lot. Adding creamed corn will give the relish a smooth texture.
Do hot dogs go well with this best corn relish recipe?
The unique corn mixture adds a twist to the classic hot dog experience. The juiciness of the hotdog and the zestiness of the corn relish will make you enjoy this delicious meal.


How do you serve corn relish?
Corn relish is delicious served along side sausage and peppers, roasted chicken, fish tacos, on top of chili or added to a fresh tomato salsa for an extra layer of flavor. I would also suggest serving it as a side dish or with crisp tortilla chips. There are so many delicious ways to enjoy the natural sweetness and serve corn relish.
FAQ's and Tips
The official Ball® Canning recipe calls for fresh corn but I have used freezer corn if fresh is not available. Fresh is best but in my opinion, if you use homemade frozen corn it is just as delicious.
This recipe will yield about 6, half pint jars of corn relish.
Canning Recipes


Ingredients
- 2 Cups white vinegar
- ⅔ Cup Sugar
- 1 Tbsp. salt
- 4 Cups corn about 8 ears
- 2 Cups red bell pepper about 2 large
- ¾ Cup celery about 2 stalks
- ½ Cup small onion chopped
- 1 Tbsp. dry mustard
- 1 teaspoon celery seeds
- 1 teaspoon ground turmeric
Instructions
- In a large canning pot, heat the canning jars and lids in simmering water until ready for use. Do not boil. Set bands aside.
- In a large stainless sauce pan, combing the vinegar, sugar and salt bringing the mixture to a boil, stirring to dissolve sugar. Add corn, red and green peppers, celery, onion, mustard, celery seeds and turmeric.2 Cups white vinegar, ⅔ Cup Sugar, 1 Tbsp. salt, 4 Cups corn, 2 Cups red bell pepper, ¾ Cup celery, ½ Cup small onion, 1 Tbsp. dry mustard, 1 tsp celery seeds, 1 tsp ground turmeric
- Reduce heat and simmer 15 minutes, stirring frequently.
- Ladle the hot relish into hot jars leaving ½ inch headspace.
- Remove air bubbles and wipe the rim of the jar with a clean damp towel. Center hot lid on jar. Apply band and adjust until fit is fingertip tight.
- Place jar in boiling water canner. Repeat until all jars are filled.
- Once the jars are all filled and in the water canner process them for 15 minutes, adjusting for altitude.
- Turn off heat; remove lid and let jars stand 5 minutes. Remove jars and cool.
- Check lids for seal after 24 hours. Lid should not flex up and down when center is pressed.
Nutrition

I am Sarah Mock. Welcome!
Sarah Mock is a classically trained Chef and graduate of Johnson & Wales University. A culinary blogger for 15 years Sarah helps the home cook prepare her recipes with professional results.


baccarat says
Love chips and junk food !
Christine says
This is such a great recipe to use up that summer corn! I could eat this relish on just about everything!
Donna says
Ooh I have canned many a thing, but never my own corn relish, so excited to be able to enjoy this deliciousness all year round!